RSS Feed


August 22, 2012
I came up with a little trick yesterday that made hemming pants easier for me.
I always had a hard time trying to figure out just how the fabric should be folded in order for the blind hem stitch to work. I knew it had to go a certain way, but folded the fabric in all sorts of directions before I got it right. I would pin it one way, fold around, pin it another way, remeasure, adjust, repin . . .
Eventually I was able to streamline the process a bit so that I no longer had to place and move pins repeatedly. I realize more experienced sewers are laughing at me, or know an even better method, but they weren't there sharing, so I figured this out the hard way and I'm going to write it down so I'll remember!

Step 1. Figure out how much you need to take up the hem. (In order for these pants to fit right, I need to fold them up ___ inches.). Pin here if you need to, but only enough to determine desired pant/skirt length and measure the amount you want to shorten the garment. (this is the 'Length of Hem' in the photo.)
Step 2. Figure out how high up you want your hem stitches to be from the desired new hem of the fabric. (I want my stitches to be ___ inch(es) above the edge of the fabric.)
Step 3. (I use my sewing gauge for this, mainly because it is awesome and I use it for everything.) on the INSIDE of your pant leg (or skirt), measure the amount you determined in Step 1, with that number on the outer edge.
Step 4. Now, fold the fabric of your pants up over the gauge until you reach the number determined in Step 2, and then fold back so a kind of pleat is created. Pin the fold down.
Step 5. Repeat all the way around the fabric. You're all set for stitching! You can trim off the excess here (all except for about half an inch at least to sew on). I prefer to trim after I'm satisfied that I haven't made any horrible measuring mistakes.
Step 6. Set up your machine to do a blind hem stitch according to directions. You will be sewing along the edge of that fold, with the fold on the right. (see photo.)
Step 8. When you finish sewing, flip the new hem to its proper position, and double check that it falls where you want it to before trimming off the excess. I suppose you could also opt to sew a zigzag along the excess before trimming to prevent unraveling. Press well!
August 20, 2012
After seeing a few sewing machines with very large platforms surrounding them, and seeing them in use, I had a major case of extension table envy. Everything's so neat and flat and glides so smoothly! I wanted one, but talking to the Husqvarna rep (did you know certain types of sewing machines have dealers?) revealed a price range of over $100 for varying sizes. Nope. Couldn't justify it. Want. Too expensive Want. It's just a flat piece of plexiglass with some markings on it! Whine. Wait, does it HAVE to be plexiglass?
My special stash of super-nice cardboard from Brian's diploma frame packaging slips into the front of my brain. "Makkkeee onnnneee" that increasingly large, encouraging, DIY portion of my mind whispers.
OK.

It's exactly what you think it is. Super dense, durable cardboard, Dollar Tree contact paper, and some temporary drafting tape with lines drawn on it until I can come up with a better idea. I used glue, a pencil, a metal ruler, and a boxcutter.
The complicated part was sizing it to the machine, but I was able to pull off the surround (I don't know its technical name, but it includes the compartment where you stash the extra bobbins and feet), and turned it upside down and drew around the hole on a piece of paper.
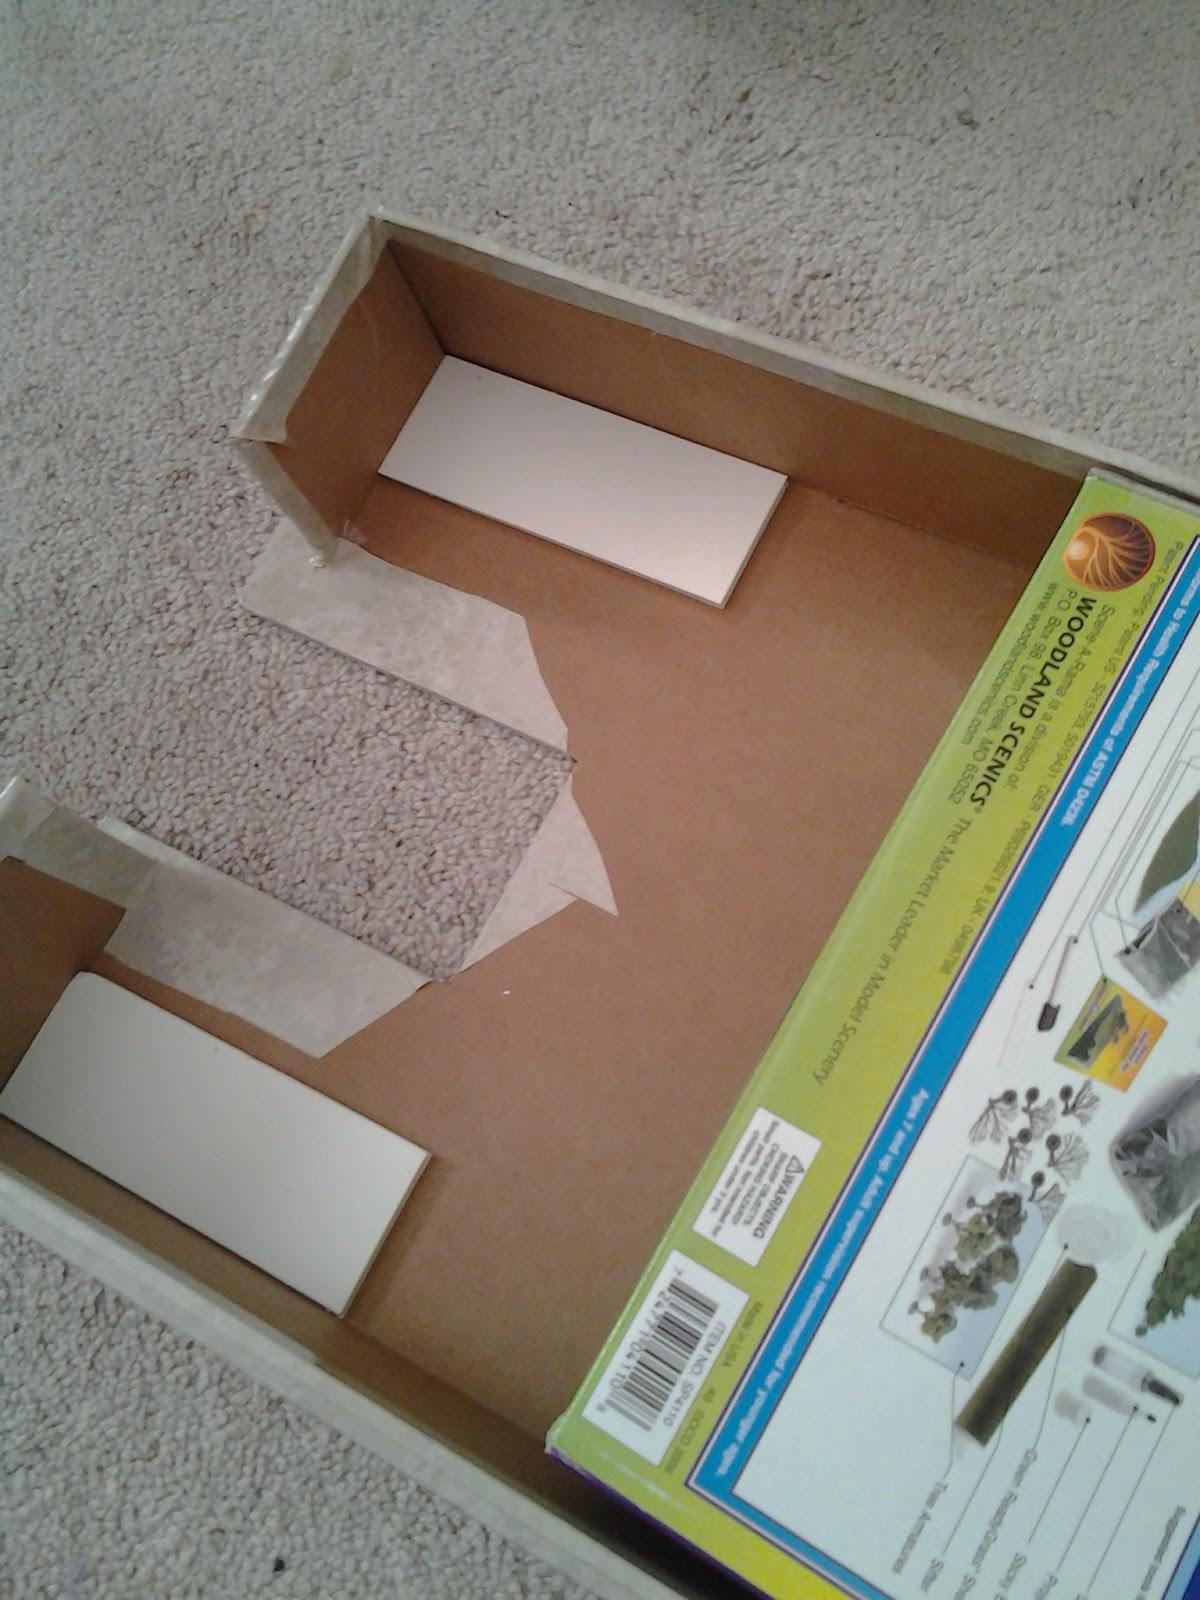 |
| View of the underside. |
Update: 1/25/2013 - This has proven to be quite sturdy for sewing. Sometimes it slides a bit out of place but that is easily remedied. I also have developed the bad habit of using it as a temporary storage space, and it can hold quite a bit of weight! Just make sure you use something really sturdy!
Update 2: 5/16/2013 - I've just discovered illustration board, and think it might be a good recommendation in place of my cardboard. It's 1/16" thick, and can be cut with an Xacto knife. I found it at Michaels in the art supplies.
August 16, 2012
When I moved, I lost the horizontal storage needed to store my jewelry box, and had to leave it behind. My jewelry lived in limbo for ages. I eventually bought hanger storage, which was great for my pins and preventing necklace snarls,
The rings were another problem. I have lots of cheapy little rings, but they were too small to take up a single pocket, and I didn't want them all jumbled up together in one. It's hard to hang rings and yet make them easy to get remove!
 So I was very excited when I first saw SellzCuteThings' DIY Ring Wall Holder Tutorial on Pinterest. Easy and cheap? EUREKA!
 I did mine a little differently, but the process is so simple that you can customize it in many ways. The foam doesn't NEED to be covered, but I wanted to see just how fancy I could make it.
The foam curlers are easy to take apart: just slide the middle bar to one side and pull the foam off. They could easily be cut to size if they don't fit perfectly in the selected box. (I tried just stringing them on ribbon, which worked, but I was afraid the rings would fall out the other side, so I had to go buy a box. I think a cardboard cereal box would have worked, but it takes us forever to finish ours and I didn't want to wait!)
I also found the pencil case at the Dollar Tree, and it was the perfect size for fitting 16 curlers at a good pressure for holding rings in place.

I used the middle bar as a stabilizer to keep keep the foam in a straight line, just ran a bead of glue down the plastic and along one edge of a curler and assemble. I measured out a piece of fabric just large enough to roll around each foam piece and glued in place.
The fabric? In my stash. Isn't it pretty? It was actually a sample upholstery fabric swatch from JoAnns - a few years ago they sold off their old swatches for a dollar or two. It does compete with the rings, though, so I would recommend using a less busy piece if you want to showcase your jewelry.

I do regret buying a see-through case. I was in an inspirational hurry, and any box the right dimensions would do so long as I could get the project done right away. I had JUST enough fabric left to disguise the otherwise messy sides, which turned out quite pretty.
The box could easily be hung if I cut a small hole in the top for ribbon. I could also probably cut the lid off, but I rather like the added security of keeping the rings inside, because I STILL can't store it flat!
So, $2 for two packs of foam curlers, $1 for the box, and I probably paid $1 for the fabric 5 years ago. I'm pleased with the end results, and now that I can see and remember what I own, I will wear my rings more often!
Note: I have REALLY small hands, my rings are a size 4, which may throw off the visual dimensions. Two foam curlers side by side measure 4.5" if you are planning your own box.
August 15, 2012

DVD Gift Wrapper
Materials:
- Hook and loop tape, 4” strip
- Fabric, two pieces, measuring 7¼” by 22”
- Matching thread
- White thread
- Coordinating Ribbon, 1 yard
- Interfacing, useful for lightweight or see-through fabrics
 |
| Diagram, body measures 7.25"x22" |
Tools:
- Sewing machine
- Ruler
- Scissors
- Quilter’s ruler
- Rotary cutter
- Point turner
- ¼” presser foot
The Layout
The diagram on the right shows the layout and dimensions for the wrapper. It’s all one piece, but can be mentally divided into three sections, the flap, the pocket back, and the pocket front.
A typical DVD case measures 7 1/2 ”x 5 ¼” x 9/16,” and I used those dimensions for this tutorial. You may have to increase the length and width slightly for double case DVDs.
 If you're using a fat quarter, be sure to double check its measurements before cutting. Different stores or clerks may cut them to a different size!
Instructions:
1. Cut two 7 ¼” x 22” pieces of fabric, either from the same fabric or two contrasting pieces.
If you plan to use interfacing, follow the package instructions to iron on the interfacing to the wrong side of one of the pieces of fabric now. Interfacing is not required, but helpful if you find you can see your DVD through the fabric layers!
If you want to sew decorations to the outside of the wrapper, do so now.
2. Align your two pieces of fabric with the right sides (the sides you want to show) together on the inside. Sew ¼” from the edges of the fabric all the way around, leaving an opening roughly 2” for turning.
I left my opening on the lower half, as marked by the orange line on the diagram above. This way you won’t see it in the final product, and it will be sewn closed when the pocket is sewn.

3. Trim diagonally across the corners to reduce bulk, (avoid cutting the stitches) and turn right side out through the opening and carefully poke out the corners. Iron.
 4. Pick one side of your piece to be the interior of your wrap. At this point I changed out my top thread to white to match the tape, but left the bobbin the original color. This way my stitches disappeared on the tape side, but weren't glaringly obvious on the red side!
Sew the ‘soft’ strip of hook and loop tape along one short edge on this side of the interior side, ¼” from the edge, and 1 ¼” from the sides. Since this is the flap that people will be touching and handling, you will want the softer piece on this end.
5. Turn the piece over to show the outer side of the wrap. To place the ‘rough’ strip of tape, measure 1 ¼” from each side, and 3 ¼” from the short edge of the piece to the long edge of the tape. Be sure that you are measuring from the edge that does NOT have the ‘soft’ tape on it. Stitch in place.
6. With right sides out, fold up the bottom half of the piece 8 7/8” and sew ¼” from the edges all the way around. Repeat with a narrow zigzag stitch for an added touch.
7. Take your yard of ribbon and align the center of it with the center of the flap. Sew the ribbon to the outside side of the flap, either following seam lines or along the edges of the ribbon. After putting a DVD inside and closing the flap, bring the ribbon ends around to the opposite side of the wrapper and tie a bow.
The wrapper is done!
Variations
You can choose to forego hook and loop tape altogether and use buttons, snaps, or ties to hold your package closed. The ribbon is a great place to tie on a nice name tag. Alternatively, if you don't want to have to tie a bow every time, you can shorten the ribbon to 15 inches and sew a small square of hook and loop tape or snaps on opposite ends of the ribbon. A premade bow or other embellishment can be attached to the top ribbon.
Having to untie the ribbon and ‘rip’ the Velcro helps to give the giftee the traditional feeling of ‘opening a present,’ rather than holding a slipcovered movie. (Let’s face it, we all love ripping paper!) The main problem with this wrapper is that it’s OBVIOUS that there’s a DVD inside. Granted, that’s the case with any wrapped DVD. The idea here is to reduce waste, not truly surprise the gift recipient. With that in mind, an empty DVD case is a great container for gift cards, cash, and small pieces of jewelry, so you can still surprise your giftee!

August 1, 2012
I've been thinking about making this tie on pincushion for a while, because I never leave enough space between my sewing machine and the edge of the table for my magnetic pinholder, and fear dumping the thing in my lap. However, my machine is surprisingly bulky, and I had a very narrow option for tying around without interfering with any dials or levers.
So, I combined it with this idea for holding cords. I made a narrow pincushion, sewing the soft half of a cut to size piece of velcro to it, and then attaching it to the machine with the Command velcro strips. My only problem was deciding where to put it! I changed my mind after making the cushion, and so it's actually a little too long for the spot, which is why there's no picture yet. I figure it'll be easy enough to move if it gets annoying, or easy to make a new pincushion if I do like the spot!
UPDATE 8/11/12: After using it for a bit, I'm not happy with the results. It's a bit wobbly on the velcro, and the last think you want is for your pincushion to move when you're trying to jab it without looking. I may have to go with the ties around the machine after all!
Subscribe to:
Posts (Atom)