RSS Feed


August 28, 2015
I don't know what it is about Myths and Legends Con that brings on a massive creative spurt, but this year I again found myself madly sewing in the weeks leading up to the event.
It really started with the custom corset by LoriAnn Costume Designs. When I got it, it immediately started whispering that it didn't WANT to have anything to do with Steampunk, and began suggesting fairy to me. I remembered how awesome this fabric had looked in B.'s orange office, and then I began thinking of various ways to do a layered skirt, and then found myself researching wings . . .
The results amazed me.

The peasant blouse was a McCalls 5050 pattern, with the lower sleeves added from Simplicity costume pattern 4046. I found the Simplicity pattern instructions so convoluted and strange that I went right back to the McCalls pattern.
------------------------------
SKIRT TUTORIAL
The skirt was a lot of fun, once I figured it out. Math got involved. It's a handkerchief skirt, but not in the way you're probably thinking of. Imagine you're taking a bunch of actual handkerchiefs and sewing them together.

The diagram hopefully helps explain my pattern for each square. I did not include seam allowances, so add those as you please. I don't think I actually did at all, and it didn't make any significant difference in my final skirt.
You'll need:
Fabric - the amount you need will be determined by the number and size of your squares, see below.
A sewing machine, and ideally a serger, or at the very least a rolled hem foot.
1" wide elastic
Before you start, decide how many squares, or points, you want on your skirt. You can have as few as 4 and as many as . . .well, it'll probably get a little crowded around 20. You can also do multiple layers, just cut a smaller square for the outer layers.
A is your preferred length of the skirt, or the highest point of the skirt hem. Measure from your waist to the shortest desired length.
Now you'll use this number to determine B, the side of the square. Take the skirt length and multiply that number by 1.414. Cut out your squares by that many inches.
Example: I want my highest hem point to be 8.5". 8.5*1.414 = 12.01". Cut out 12"x12" squares of fabric.
Now give yourself a pat on the back, because you just used the math you never thought you'd see again after high school geometry!
a
=
2
d
2
d=diagonal, a = side of square. Since we only needed the measurement of half the diagonal anyway, I left the division out. All you need to know for this is: 1.414 x hem length of skirt = square side length.
OK, time to measure your hips. NOT your waist, your hips. You want to have enough room to pull the skirt over your hips, and the elastic will hold it in place around your waist. Take that measurement and divide by the number of squares you plan to cut out of your skirt. Example: 36" hips, with 6 squares, 36/6=6. This gives you C, the dotted line, where you need to cut. I merely took a ruler, and moved it down horizontally from the point until I got my length from edge to edge, drew a line, (make sure it's even) and then cut.
Next you have the fun of finishing all the edges. The serger made short work of that, until I somehow managed to snap off one of the fingers of the needle plate. You can either leave the squares all separated or sew them together from the cut corner to the next corner, marked D on one side of the diagram. I sewed the lower layer together this way, and simply serged them together. I used a contrasting thread, so did my serging on the outside so it showed.
Cut a length of fabric at least an inch longer than your hip measurement, and about 2.25" wide. Stitch the short edges together to form a loop.
Fold in half longways, wrong sides together, and stitch, leaving an opening of about 2" somewhere along the line. This will be the casing for your elastic.
Pin the cut corner edge of your top layer of squares to the stitched length of your fabric and baste. Then pin the next layer and sew everything down.
Now you can measure your waist, and add a little extra for your seam allowance. Cut your elastic to this size, and feed it into your casing, then sew the ends together. Sew your casing hole closed, and if you like, add a few stitches here and there, through the casing and the elastic, to prevent it from twisting around. I wouldn't recommend sewing it all the way down, because eventually the elastic will need replacing and it will cause a ridiculous amount of seam ripping (she says from experience in buying skirts with shot, sewn down elastic at a thrift store.) You now have a handkerchief skirt!
Please feel free to email me with any questions. I am writing this after an exhausting and unpleasant week, so my brain is fried. My inspiration was this little girl's outfit on Melly Sews, so hopefully that will help you where this doesn't.
-------------------------
Finally, about the wings. I fell in love with EnchantedHearth's wings on Etsy (I originally found pictures on Pinterest), but her shop was closed, and closed, and closed, and I panicked and made my own. (she reopened it the weekend of the con, wouldn't it figure?)
There really isn't a pattern, just a 'jump in and do it.' I played with tissue paper, drawing wings until I got a size and shape I liked, then used that as my pattern. I left a little extra at the top so I could make a casing for the wire. Then I serged around all the edges. Well, 'serge' is a generous term, since my serger was broken. I ended up doing a really tight zigzag stitch on my sewing machine, and went around all the edges TWICE. It was probably better this way, since I don't have a lot of speed control with my serger.

I used a sheer drapery fabric that was mostly flesh toned, but felt they needed more green. I just couldn't find anything that had the mottled look I wanted, so I screwed up my courage and bought . . . spray paint.

Design Master Tint It was recommended by other people on the Internet as being good for fabric, so I took a chance. I also bought a glitter spray paint, because I wanted some sparkle. Then I took the plunge. I sprayed mostly around the edges, and particularly along the top, as the layers of fabric didn't all take and I had some obvious peachy spots.

This was a bad picture, since it was at night in the basement, but I loved the way they turned out. here's a better photo at the con:

I used green florist wire and simply stuffed them down my back, making sure they got tucked behind my bra strap and under the corset. I quickly learned about wing awareness and how to maneuver in crowds, but they held up great, and also packed pretty well. The paint made them a little stiff, but that was actually a good thing. I'm not certain if I left a trail of glitter, but there's still plenty on them!
 |
| Of course I brought a Mal to MaLcon! |

I also bought some pretty elf ears from The Implied Line, and got my face painted at the event. I didn't even know they'd have that, so it was a nice surprise!
June 7, 2015
I'm not sure how I found out about this, but probably a random Internet search for local Steampunk events. It was in a town we were interested in visiting, on our anniversary, and Steampunk themed. We mutually agreed to do it.


My outfit is still pretty basic. I'm going for Steampunk Lady Explorer. The skirt is a 25 yard skirt commonly used in belly dancing. The awesome ladies at Tribe Nawaar were demonstrating how to tuck it up and 'bustle' it at AnomalyCon, and I fell in love. The natural collor turned out to be a bit thin, so I had to add an underskirt to it, but the more layers, the better!
The corset is a red chenille 'wench' underbust from Damsel in this Dress. I made the peasant blouse, and found the cropped jacket at a thrift shop. The hat is from Patterns of Time, and while a little big on me, is really the best part of my costume. It's also really nice to wear when walking around in sunshine!

B. wore his awesome new vest from Pendragon Costumes with basic pants, shirt, vest, and newsboy cap.
The Leadville event included a 2 hour historic train ride up the the mountain and back. Wonderfully scenic! We had a great time at the Museum party, and hope they'll do it again next year!


May 25, 2015

Remember that disappointingly small kitchen faucet I bought from miniatures.com?
I searched for a ridiculously long amount of time for a replacement. I even scoured Shapeways.com in the hopes that I could possibly get one 3D printed. I even downloaded Sketchup with the idea of creating my own design to print. Three hours of frustrating work with a program that kept freezing finally convinced me to stop wasting my time and turn to some time honored polymer clay to get the job done.

My inspiration? My own Kohler faucet. It's a good faucet. It has a pull out sprayer feature, a handle that can be easily accessed by both left and right hands, and a good height for tall pots. Why wouldn't I want it in my dollhouse? And making the thing only took me about two hours. Nothing compared to the amount of time I spent shopping and fussing with 3D printing.
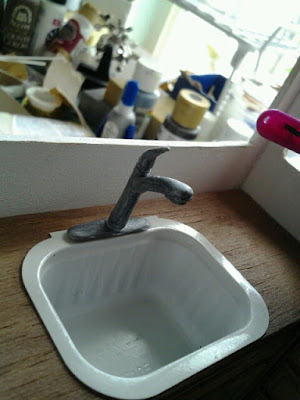

It'll be easiest to see it through the window.
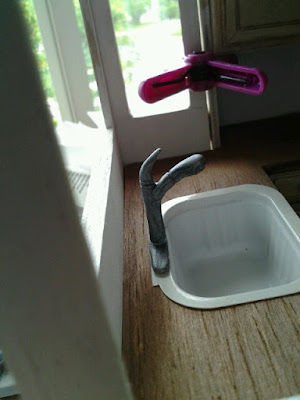
I like the height. I'll have to get Robin a stock pot just to show off its height feature. I also like how it nearly reaches the middle of the sink. I suppose I could have made it a little longer that way, but this looks adequate.

Here's Robin for 'human' scale. She actually makes it look a little on the small side, but nowhere near as bad as the previous faucet!

Here's the Farrow faucet I originally purchased. Doesn't it look ridiculously small? Can you imagine trying to turn on that little handle? It looks like a soap dispenser, or a drinking water dispenser here. Perhaps I'll keep it for that.

Here's a distance view. I much prefer the bigger faucet here. It says, 'here is a serious kitchen faucet. Stuff gets washed here.' (Don't worry, that unfinished spot is where the dishwasher door goes.)
 |
| Why? |
One more necessary item I can check off my to do list!
May 24, 2015
I got my pot lights hooked up! I'm a little disappointed, actually. They're not as bright as I hoped, and so the kitchen has a soft, deserted, late night feel. The photo, of course, doesn't show this.

Here's a reminder of what it looks like on the other side. I painted the plastic with white nail polish to make them brighter.


May 9, 2015
Where did she go? What happened? Did she give up?
No, she got a job, and has been desperately playing real life catch-up.
But it was raining, and raining, and raining, and my motivation wavered horribly. I sent a whiny email to The Camp about not having time to make anything anymore. So of course today I perversely sat down and made something.

A mess! Well, a mess would have been interesting. Instead, I made a ceiling, which is likely something you will never notice if you ever see the house in person. There's more details to add for this, I just need to get some more shiny sided poster board and figure out the trim around the lights.
I raved about beautiful decorative ceilings in a previous dollhouse post, but a 20th or 21st century kitchen doesn't have that kind of detailing, unless it's a really expensive house. When was the last time you looked at your kitchen ceiling? Do you even know if you have pot lights, or how many there are? I didn't think so.

The ceiling is illustration board, with circles awkwardly cut out. The pot lights are blister bubbles from some random expired medicine I found while digging through my cabinet. I added 3/16" strip wood around the edges for a minor drop down ceiling so I had room for the wiring to run.
And the wiring? Ooh, the wiring. I got that from Evans Designs. Four LED lights hooked up to a single transistor. I used 2 sets, and I 'should' be able to attach them to my dollhouse tape runs, no problem. There was plenty of space on these for me to spread them out, and I was even able to drop one of them down so it will light up below the microwave. The bulbs were a little over an eighth of an inch wide, and the transistor exactly 1/8" thick.
Since the ceiling is so big, and I wanted to test and make sure it would run ok without hooking it up to the main house wiring, I had bought a junction splice so I could make a temporary testing board. I was rather shocked when I discovered that my lead-in wire didn't fit in it! So now this project is on hold again, but at least I've made a little more progress.
I'm fairly certain that Judy Ryden's blog inspired me, or simply did what I was wanting to do first, so I'm giving her credit here. She's the only one I've found forging pathways for DIY LED lighting in dollhouses, and has some fantastic tips and tutorials.
February 7, 2015
I haven't done a lot of crochet this past year, and it's all the fault of an afghan.
I get much colder at night than B., so I have a throw for my side of the bed. It's a basic no-sew, fringed and tied end fleece blanket that I've had for ages. It went much better in my previous bedroom with its rustic style. It looks downright silly on a Chippendale four-poster.
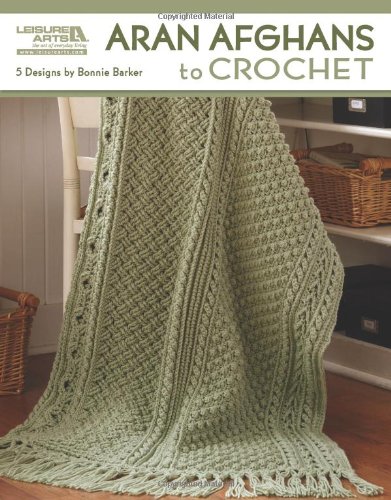 |
| My book doesn't actually look like this. |
I particularly liked this book for the way it gave instructions. It would specifically label sections, i.e. (cable row) so you could conceivably combine different stitches and make up your own pattern.
I went with the Basketweave afghan, although I initially bought it for the Sampler afghan. Sewing together sections of crocheted yarn is annoying, so I moved on.
I'm terrible when it comes to reading crochet instructions all the way through. I figure if I don't know a stitch, it will take me five minutes to look it up and figure out how to do it.
 |
| Really, I should have stopped here. |
About this time B. got interested in the project. He liked the look of it. He suggested that I make it big enough to cover the bed. The big, huge, king sized bed that comes up to my waist and is fondly referred to as the Monster Bed. I resisted, but he kept suggesting, and so I modified my pattern again. I bought more yarn. Then even more. I had to wait and ransack various Walmarts because they generally only carried 4-6 at a time, and apparently the had exclusive selling rights on that particular color, because it was the only place I could find it.
The afghan got bigger. And heavier. And harder to maneuver. Eventually I stopped working on it, because I'd had a molar removed and was exhausted and achy and recovering slowly, and it was just too hard to deal with. Plus the weather was getting warmer and I was sitting under a ridiculous amount of yarn.
I didn't attempt to start any other projects during the year because 'I still had that afghan to finish.' (I did knit a few hats.) Finally in January I hauled it back out, and finished it in early February 2014.

 |
| That center panel is an example of the 'Celtic Weave' |


When I was a foot from the end, I came to the horrible realization that the celtic weave panels had really messed up my stitch count. Yes, that's another bad crochet habit I have, not double checking how many stitches are in a row, but when you have to count up to 241, you don't want to do it often. Fortunately I was able to tug it all straight for the photo! You can also see it isn't long enough to cover the foot of the bed, but that's because it wasn't meant to when I started it. I don't like fringe, and I really don't want to have to come up with an additional panel, so I'm just going to call it done.
You want to know the stats now, don't you? I haven't measured it, but I did manage to make it hang down to the side rails on the bed, so it's at least 110" wide. I lost count early on of how many skeins I used. So after taking these pictures, I was crawling around on the bed for a good half hour, searching carefully for where I had woven in a new skein to the old and tying bits of red thread around the spot. I came up with 36 skeins. That's roughly 9,000 yards, or 27,000 feet of yarn. Each skein is roughly 5 ounces, so the whole things weighs a touch over eleven pounds.
It's nice and warm, and I no longer have to move it, or really look at it. And eventually I will find a bedspread for underneath it that I like and actually fits properly, and get a dust ruffle made, since one can't be had for a decent quality and price.
In the meantime, I'm going back to hats and scarves and amigurumi and other stuff that travels easily, or at least can be carried up and down the stairs without issue . . .
Subscribe to:
Posts (Atom)