RSS Feed


 Posts
All Comments
Posts
All Comments
June 11, 2013
Judging from what I've read online, the Willowcrest dollhouse kit by Greenleaf has a pretty big fan club. I decided to see what other miniaturists did with their kits. What changes did they make? What problems did they run into?
I found quite a bit of awesomeness, and I sincerely hope that this time I'm up to the challenge. Right now my Willowcrest just makes me want to hide it or pretend it had been trashed by tiny squatters.
I just had to share my findings. You will find more pictures of each dollhouse by clicking on the provided link.
Check out these Willowcrests:

http://mywillowcrestblog.blogspot.com/
This UK miniaturist made her Willowcrest a fabric and yarn shop! She addressed the super narrow front porch by turning them into shop windows. Be sure to notice the railing on the roof and the intriguing multicolored shingles.

http://myminiaturemenagerie.
blogspot.com/search/label/120%
20Copper%20Court
An elegant version with a beautiful nursery in the top floor. I got a little lost trying to find my way around the house. She bumped out the kitchen bay, added a hallway on the 2nd floor, and reversed the attic stairs.

Robin Carey does FANTASTIC interiors. Be sure to check out the rest of her blog! I've never actually looked at dollhouse ceilings before, but she really makes you look in every corner.

 http://flickriver.com/places/United+States/ Maryland/Frederick/Willowcrest/search/
Laura Davidson made her Willowcrest a classic Victorian. I love the bold colors she uses on the interior, and the kitchen is amazing.
And now for something a little bolder:
http://jennysminis.blogspot.com/2012/09/the-willowcrest-house.html
Jenny did some amazing things with the siding on her Willowcrest. I just love it!

De made her Willowcrest into a wonderfully detailed home for her handmade dolls. Seeing the photos and the accessories makes me want to get in there and meet Baily and Josh!

http://littlepeopleathome.blogspot.com/
Scroll to the bottom and click on the Willowcrest slideshow. It's nice to see another red Willowcrest! I love the modern kitchen.

No exterior shot that I could find, but if you're an art nouveau lover, get ready to drool at the interior! Dominique's petit cabinet de curiosites is an amazing tribute to the style. LOOK AT THE WINDOWS. And then stick around and check out the amazing items she has made or collected for the house. And obviously I need to pay more attention to my ceilings.
I believe this is the same house, with a few extra pictures, as seen at http://www.humptydumptyhouse.fr/ archives/la_willowcrest/index.html

Deb Roberts provides a fantastic tour of her Willowcrest. She's turned it into a select men's club in London. Don't miss the spiral staircase, and I would totally live in the exclusive attic.
She also has a video.

Gina at More Minis blogged the building and decorating process for her Willowcrest. I wish I had been able to see this before I started on mine 16 years ago. Love the painted lady look!

Heather and Tommy assemble and decorate houses for those who don't have the time or inclination. Their version of the Willowcrest has sold, but you can still get some great decorating ideas from their gallery!

Ok, these pictures are a little hard to see, but look as hard as you can at that domed roofline! Very unique. Now to track down Joyce Tidrick and beg for bigger photos!

http://www.etsy.com/listing/63356312/ dollhouse-ballet-school-reserved-for
I don't know how much longer this sold listing will be here, so I'm posting two of the pictures. Here we have the Willowcrest posing as a ballet school by Teresa of Plume Poppy Designs!


http://www.amazingmini.nl/poppenhuis/ Poppenhuiswereld/The_Willowcrest.html
This website is in Dutch. Click on the big 'hier' link to see more photos! Dinie in the Netherlands took out the stairs altogether to make a huge kitchen. Also be sure to check out the magnificent parquet floor in the living room!

Pamela J's dollhouse has a tea party in progress. I've never seen the resin dolls used so effectively! Check out the placement of the attic stairs, as well as the clever use of trimwork all over the house.

Grammapux demonstrates a few decorating tips with her Willowcrest album. I never considered model railroad gravel for flat roofs!

CDHM artist Lauretta Carroll of Midnight Magic Miniatures loved the Willowcrest so much she designed a version in 1/144th scale! Scroll down to see it and possibly order your own.
http://miladyestates.wordpress.com/tag/willowcrest/
Finally, Lady Christin has just started on her Willowcrest, and it looks like she will blogging about it. Judging from her inspiration pictures, it's going to be amazing! Keep an eye on her site!
Even more versions can be found on Greenleaf's forum. It's free to sign up, and you can find a lot of helpful people there!
If you have a Willowcrest, I would love to link to it, or post pictures of it in this collection! Send me photos!
Update - 9/5/2013
I found Linchen's Little Cottage blog, with work-in-progress posts of Lina's Willowcrest. So far she has added windows and divided up the third floor attic into two rooms with a hall!
Update - 10/23/2013
I found this auction on eBay - hopefully you'll be able to see the images after it's over. Yellow house, claiming to be a replica in Saratoga, New York. Cute swinging bar doors to the kitchen, and a bathroom and walls added to the garrett.


Update: 11/24/2013

Nancy and Vall in the Netherlands made this wonderfully detailed 'house of negotiable affection.' I love the colors and wallpapers, and so much attention to detail! (I actually did the moss bird's nest on my house, but mainly to hide a mistake I made under the eaves of the dormer windows.) Caution - there are some very naughty dolls in the last few pictures!
Update: November 2, 2014

Wasting-Gold-Paper found a finished Willowcrest in wild colors and has plans for a magical girl's school. So far this is the only post about her Willowcrest, but hopefully she'll swing back to it!
Update: 3/21/15
Gina at More Minis has an awesome blog where she documents building various dollhouse kits. Watch her build her Willowcrest! (It's probably going to be a lot faster than watching me redo mine.)
For information on historical architecture relating to the Willowcrest, check out another post - Real Life Willowcrest?
Update: May 14, 2016

Update: June 20, 2016
The Willowcrest is also appearing in artwork! Admire this oil painting by Susan Lyon.

Also, website designer Anne Gerdes designed the menu feature for the Miniature Designs shop. Look familiar? (Websites change their look frequently, so I posted the obvious elements below.)

Updated 6/26/16
Carys of Northampton is parting with her completed Willowcrest and posted some amazing photos. I uploaded the two most thorough since there's nowhere to link to them. Her version even has a back so you can fully close it up! I love how it has furniture and lighting attached to it.


I recently come across another super miniature kit on eBay. They are calling it an 'Aegean Sea' house, and claiming it's 1:48 scale (or O scale.) The glass ball it's in is 5" wide, according to the description. If it's a direct Chinese knockoff of Midnight Magic Miniature's version, I apologize for purchasing it. I'll let you know the actual dimensions, and hope that this is a Willowcrest I actually finish!

June 9, 2013
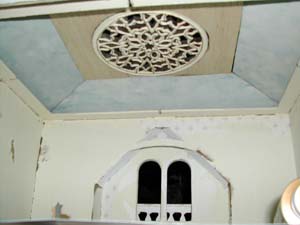
In my second renovation, I cut off the top of the roof and put in a skylight.
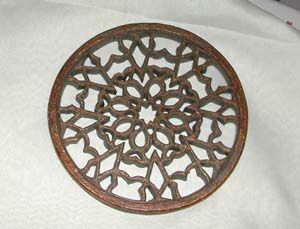 |
| This was originally a wooden decoration over a mirror. |
I loved the look, but last year I spent the night in a fancy hotel room with a skylight and realized that you would never be able to sleep after sunrise with such a thing in your bedroom, and that I'm going to have to make some sort of change.
Should I . . .
A. Switch the bedroom and the study?
B. Take out the skylight and replace the original roofline and save the skylight for another project?
C. Replace the roofline, but reinstall the skylight as a fancy ceiling medallion?
C.1. Hang a chandelier from it?
C. 2. Install lighting behind it, effectively making it a very large ceiling light?
C. 3. both?
D. Leave it as it is and stop trying to be so practical with a dollhouse?
Feel free to vote in comments. I'm leaning towards option C.1 myself, but it could be years before I find or make a chandelier I feel would be adequate.
June 6, 2013
We are now on attempt #3 with this bathroom window. I wanted something fancy.
Here is the 'original' bathroom. *update! I found a photo of the outside! Had to dig through hard copies to get it!* It was a very simple design, just a row of angled shingles and a large 'stained glass' window.

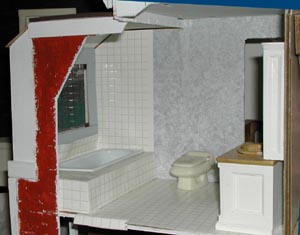
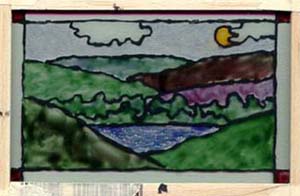
I decided to try going fancier and making it an angled bay a few years later.


I never secured it to the house, and it totally fell apart in the move. (It was in a separate box at the time, not on the house.) I was kind of forced to do Bay #3 after that. Plus the need to update the peach corian look!
So I began update #3. I used illustration board this time, and spent ages trying to fit the three arched windows evenly across the extension. I feel this version fits the exterior style better than the other two. I tried to match the shape of the mansard roof line, but it wasn't easy!

 |
| Yes, I AM a messy crafter! |
While I was at it I also filled out the bits of the floor along the front edge so it was even all the way across. Previously it had a half inch inset since this was originally a small bay. You can see below the patchwork of wood I've done for every renovation. What a jigsaw puzzle!

June 5, 2013
On to my current and most time consuming obsession: the Willowcrest dollhouse, by Greenleaf. It's not available on their web site, but it looks like Hobby Builders Supply has it in stock.

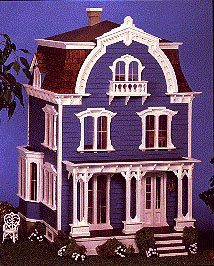
This was my high school graduation gift from my parents way back in 1997. (I got luggage for my 18th birthday and a house for graduation. Was this a hint?)
I picked this particular style for two reasons. The first was that the house reminded me of trips up to Pennsylvania. There was always one section we drove through, along the river in Harrisburg, full of these Victorian houses with huge porches and tall mansard roofs. I loved that part of the drive. I figured if I was going to have a dollhouse, it was going to be in a style that I would gladly move into in real life.
The second reason was the floor plan. It was, I felt, far more realistic than most houses available. I hate the way most dollhouses are laid out. Open staircases are randomly stuck in rooms. No hallways. You have to walk through the bathroom to get to the bedroom. I was doubly spoiled by my first dollhouse, built by my great grandfather, who custom designed the house with a real life floor plan. The house is two rooms deep, accessible from front and back, with a hallway down the center and some rooms having two doors. The Willowcrest tucked the hallway and stairs behind the kitchen, where it was there in the house, but not taking up a lot of space.
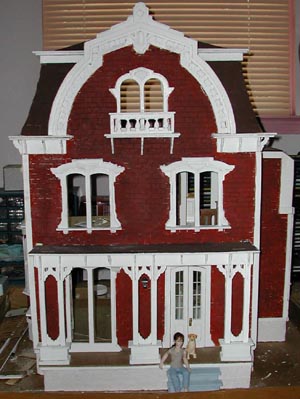 |
| That's Robin and Simon on the front porch. This was supposed to be MY house, decorated the way _I_ would do in real life, but she stole it. We're working on a compromise since we have similar interests. |
I've never been good in crafting classes, because I've been given all these materials, why can't I do what I want with them once I have them? I have a kit. It's mine. It's just a suggestion once I get the shell going!
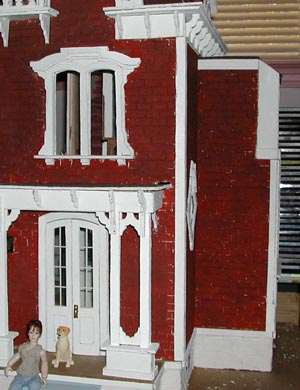 |
| view of the kitchen and bathroom extension from the front of the house. |
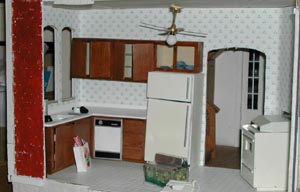
The second thing to go was the kitchen bay window. It didn't so much go AWAY as go OUT. I extended it about 3 inches so I could make both the kitchen and the upstairs bathroom bigger. They're TINY. (15 years later, I still think it's too small, even with the bump out, but I can only do so much reconstruction.)
Finally, I did away with the fireplaces and the chimney. I just felt the chimney was taking up too much room in the attic. I took out the attic stairs, too, but I'm seriously reconsidering adding them back in.
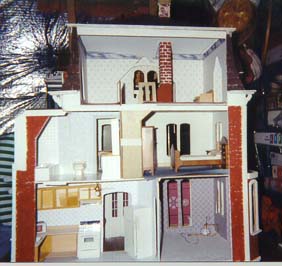 |
| My Willowcrest, circa 1998. |
I have worked on this house in stages. There is the original stage, which I believe is pictured to the left, pre chimney and stair removal, and the first incarnation of the bathroom bay window. The second incarnation has the stairs and chimney removed, and a more formal bay for the bathroom. It also included a redesign of the roof with a fancy skylight. (Hey! I just noticed the attic has a ceiling! I don't remember doing that!)
I am now in my third renovation. I have lots of plans, and I fear at the end people are going to look at it and start calling it the Pinterest House. "Hey! I saw THAT idea on Pinterest! And that! and OMG that!" Because that's pretty much where I'm getting my ideas for it.
Plans for the third renovation:
- Bay window revamp, and slight extension to level out the front of the house.
- Extension of front porch (by 4 inches so my porch swing will fit on it. The old porch was barely 3" deep. Who has a porch that's 3' deep? Even our townhouse with it's square stoop was deeper than 3'!)
- new front porch. The porch never punched out or lined up properly. It was just too much of a mess, and I figured it would be easier if I just made a new one. There's only so much wood filler can do!
- New front door. I was never quite happy with the front door. It's nice, but it's just too narrow to be a double opening door, and when I installed it, I made them open OUTWARD. I don't know why. I'm going to make the new door a single one, opening inward, with a simple stained glass window and a mail slot. I've always wanted a mail slot in my door! I may also include an old fashioned doorbell, the kind you twist to ring. My mother-in-law has one on her front door and it's so much fun. (her house is not old.)
- Electrical rewiring. Big plans here. I'd love to be able to include LEDs but I'm not sure if I can make it work yet. The premade ones are just too big, and apparently not very bright. I have to do something, though, as it looks like portions of my current system will not work. I see at least one actual tear. Toying with the idea of making everything fully functional, light switches and all. In a setup like this it's totally possible.
- New lighting. I'm thinking pendants over the kitchen sink, and ceiling lights everywhere. I may move the ceiling fan to another room. It looks like I'll be designing my own, which could be fun.
- new color scheme. I'm going for earth tones, which isn't exactly Victorian. I wish the house were Craftsman style but there's just no way I could redo it that much. There's already two layers of wallpaper in some rooms.
- new bathtub. I wish I could do a separate shower but there's just no room. I may just go super modern. We'll see what happens. With the second renovation I made a big fancy soaking tub, but after thinking about it, neither me nor Robin are likely to take lots of baths. I'm going to see if I can put in a tub but make it look like a shower stall.
- bedroom set. I have one currently for the house, but I saw this bed on Pinterest that I fell in love with and will never be able to own. You've probably seen it. It's awesome. Wait til you see my version of it!
- living room set. I bought a nice sofa and chair recently, but it's too big for the living room. Very frustrating, so I'm going to make my own. It will be bright red, to calm my red sofa desire, and probably with one of those extensions for your feet or extra guest seating. It will work. I don't know yet what I'll do with the sofa set. Maybe save it for my niece?
Right now I've gotten the bay window mostly redone, and the extension of the front porch is well underway. I also have the front door pieces cut out, but not yet decorated. I'm still slathering and smoothing wood filler in all the necessary places, and that takes forever as you have to wait for it to dry, sand, paint to see if that will fill it in nicer, and start over.
I will feel the house is mostly 'done' once I get the outside to my satisfaction. Then I can concentrate on it room by room once I get the wiring worked out. Details will be documented here!
June 3, 2013
I've gotten totally hung up on how to write about my jewelry box revamp. I don't want to post pictures of my jewelry online, even if it isn't expensive, and I also don't want to dismantle the whole thing to show you, so I'm going to just do a very long 'there is too much - let me sum up' post and show you the awesome things I've produced since moving to Colorado. (It's so nice to have a big craft room!)
1. The Jewelry Box. (un-illustrated until I make up my mind)
I spent my days in the temporary apartment plotting how I would do this. I have a lot of pendants, and wanted to just see the pendant part. In most jewelry boxes, (which only seem to think that the average woman owns only 6 necklaces) you hang your necklaces up, and the pendant part ends up lost at the bottom somewhere. How am I supposed to know which is which? my jewelry box is a large rectangular piece with two doors on the front, which has three hooks on each side and a little cubby box at the bottom to keep your jewelry from getting caught in the door. On one side, I removed the hooks and instead placed a number of rectangular squares of wood about 1 1/4" tall and long enough to fit snugly within the door. I cut notches in the top of each, although I don't think it's actually necessary. I drape a necklace chain over the top, chain dangles down the back, all I see is the pendant. At the bottom of each rectangle I plan to glue a thin layer of fabric to keep each row of necklace chains separate, to prevent tangling.
I also put in a narrow square pole in the interior to drape my bead necklaces and other items too bulky to fit in the door. On the right hand side I took a square of fabric similar to cross stitch fabric, only the holes were much bigger, and installed all of my earrings. I mostly wear studs, and now I can easily see them all! My rings left their DIY box and moved back in to the ring drawer inside the cabinet. Pins got tucked in to other areas. Everything's so nice and easy to see!
2. Shower Curtain


3. Mountain Paintings
 |
| Work in progress - but shows the colors properly. |

The same bathroom is long and narrow and BEIGE, and I wanted a series of pictures to fit that narrow space and break up the blah. I was inspired by a set of three vivid paintings by Don Li-Leger that I found online, but felt they were too big for the space. I picked up four 8" canvases at JoAnns (they were half off, too!) and proceeded to paint my own! I picked the colors to go with Plan A shower curtain, otherwise I would have done something floral. Instead I tried to imitate the mountains from this photo by James Bo Insogna.
4. Rainbow Crocodile Stitch Scarf

This is my travel scarf. I worked on the majority of it in trains and on planes. It's so soft and everybody seems to love it. Once I figured out the instructions it wasn't difficult at all, just very, very repetitive. (I was doing it left handed, too!)
5. Hobbes


You know you've always wanted one. I found a pattern on Instructables and tried it out. It came out . . . OK, but it will be a while before I want to do hand stitching again! I kept trying to come up with ways to make it easier to do, and may try them out one day. I could NOT find black oval buttons. I even bought a brown/wood pair and tried painting them, but they just looked like painted blobs, so I went with round instead.
6. Peasant Blouse and Skirt

I needed something to go with the bodice I bought from Olde World Wardrobe at the AnomalyCon earlier this year. I found a simple peasant blouse pattern and a long skirt pattern that was NOT in the costume section of the patterns, and made these up. Nearly instant wardrobe! I think this will be adequate for a Ren Fair, right? Except the hair thing . . .
7. Hip Bag


I made a fancier version of my hip bag. I iddn't bother with the card pockets this time, just one fabric divider in the center. I tried to make it all one piece, but got SO confused because I forgot how i turned it right side out! Oh well. Maybe I'll be happy with the NEXT one . . .
8. Willowcrest

Yup, I came back to my sadly neglected Willowcrest. I've spent most of my time smearing wood filler everywhere and trying to smooth things out, but I also rebuilt this extension for the third time. (I can already see the roof is going to need more attention!) My next series of posts will be covering my progress. I redid this section, and am currently working on extending the front porch in between smears. My future plans include redecorating the entire interior, a new front door, a new kitchen, rewiring (possibly with LEDs) and landscaping.
There! I think I've remembered everything. Now I can move on.
May 18, 2013
The town of Erie, CO hosts a hot air balloon festival in conjunction with its town festival every year in May. I had a fantastic view from Erie Parkway and County Line Road. The event started at 6 am, but the balloons didn't really start popping up until about 7:15 or so. It got confusing for a while, as I first saw a balloon at 6, but it was coming from the west!


Seeing these made my day. I may as well go back to bed now . . .
April 23, 2013
Oops, it's been a while. I've been busy! The move went well, with only a few missing or broken items. The unpacking was easy, it's the organizing that's really slowing me down, but I'm working on it!
 |
| Author Gail Carriger and me |
In all the house and moving obsession, I had a new distracting topic pop up. We discovered a steampunk convention in Denver called AnomalyCon, and decided to check it out. (It was near Norm's Miniatures, so we made a day of it!) I fell in love and have been steampunk obsessed ever since. I fit in! Well, OK, maybe not visually. Everybody we talked to had something in common with my own interests, whether it be sewing, knitting or crochet, history, costuming, or computer related. I tried on corsets for the first time and ended up buying not one, but two. I then proceeded to buy patterns and fabric with plans to make costumes, realizing that this was just a natural extension of my doll making. I am my own doll!
I've also worked on several projects, but I'll write up separate posts for each of those.
March 14, 2013
Erie, CO continues to intrigue me, especially its street names.
Towns have wild ideas about naming their streets. Some just stick with numbers. Washington, DC, for example, went with both number, letters, and State names, with little side streets generally random. Herndon, the town I grew up in, went with the classic Presidents and Trees. Centreville had lots of Civil War related street names. Tons of neighborhoods have their streets named after what I assume to be the daughters of the developers.
Erie's streets, few that they are, are all obviously last names, and according to their historical society, named after influential residents. I shall gleefully spend my time researching these people at some point.
And then there's the names in my new neighborhood. I spent way too much time researching, trying to figure out who they might have been. My results kept turning up athletes. and then, with that hint in my brain, I looked at the layout of the neighborhood streets again. I realized it was a baseball field.

Can you see it? There is a playground at the pitcher's mound, and a random cul de sac, the only one in the neighborhood, is home plate.
With this in mind, I started researching the names again, and also looking at what positions they played to see if their position on the field played a part in which street was named what. (PS, I know very little about baseball and had to look this stuff up.)
This is what I came up with. There may be other matches.
Sanders Circle - Deion Sanders, center fielder
Stockton Dr - (Dick Stockton, MLB announcer) (ok, no match here)
Conrad Dr - Brooks Conrad, 2nd/3rd Baseman
Woodson Dr - Dick Woodson, Pitcher
Hoffman Dr - John Hoffman, Catcher
Akers Ct- Fred Akers, Coach
I am amused, even if I turn out to be totally wrong.
EDIT: I'm totally wrong, but I was entertained on a dull day for several hours!
March 12, 2013
Y'know, that post on Colorado town name and histories was so fun I think I'll do it for Northern Virginia . . . again, Wikipedia except for when an alternate link is provided.
Herndon: Incorporated in 1879, officially named Herndon in 1858 in honor of Commander and explorer William Lewis Herndon, who went down with the SS Central America in 1857.
Dranesville: Named for the first postmaster in the area, Washington Drane, about 1823.
Great Falls: Named for the nearby Great Falls on the Potomac River, portions of it were owned by George Washington, who attempted to build a canal along the river.
Falls Church: Named after an Anglican Church parish, which was named for its proximity to Little Falls, a waterfall on the Potomac River. Incorporated in 1948.
McLean: named after John Roll McLean, former publisher and owner of the Washington Post, founded in 1910.
Centreville: Originally called Newgate, established as Centreville in 1792, this town was considered the halfway point between Alexandria and Warrenton.
Chantilly: named for Chantilly Mansion, owned by the Stuart family, built around 1817. The area has been settled since the 1700's.
Reston: A planned community, named for Robert E. Simon, who bought the land in 1961.
Sterling: The railroad stop for this area was renamed Sterling in 1887.

Tyson's Corner: Originally established as Peach Grove in 1851. Renamed for Postmaster William Tyson after the Civil War.
Ashburn: Originally called Farmwell after a nearby Lee plantation, the land was named Ashburn Farm by a Quaker who purchased it in 1841. Legend states the village was named after an ash tree that was struck by lightning and burned for a week in 1896.
Vienna: Settled in 1754, incorporated in 1890. Originally called Ayr Hill after the first house built in the area, renamed Vienna in 1849 after Dr. William Hendrick's request the area be named after his hometown of Vienna, NY.
Fairfax: Named for Thomas Fairfax (6th Lord Fairfax of Cameron), who was granted most of the land in Northern Virginia by King Charles. The town was established in 1805.
Leesburg: originally named George Town (after King George) by tavern owner Nicholas Minor in 1757, quickly renamed Leesburg after Thomas Lee (father of Francis Lightfoot Lee) in 1758.
March 11, 2013
My decision to blog about Boulder turned out to be a bit limited. I won't be living here much longer! We'll be moving east to Erie, Colorado shortly, and everything I've scouted out will not necessarily be the most convenient to my new location. Oh well!
I thought I'd write a little about the other towns and a little history if I can find it. Information generally pulled from Wikipedia. Will do more research later to fact check and expand.
Broomfield: Incorporated in 1961, named after broomcorn, or sorghum, that grows in the area. A breakaway town from Boulder.
Boulder: named after Boulder Creek, which is full of large chunks of granite washed down from the mountain. Settled in 1858, incorporated in 1871.
Erie: Incorporated in 1874, named in honor of the influential Rev. Richard Van Valkenburg's hometown of Erie, PA. Coal mining town.
Gunbarrel: more of an area than a town - presumably named for the straightness of the road between Boulder and Longmont, 'gunbarrel straight.' (info found on a cached version of gunbarrel.net)
Lafayette: Incorporated in 1890, named in honor of Homesteader Lafayette Miller by his wife, Mary, who donated the land for the town in 1888. A coal mining town.
Longmont: Founded in 1871, incorporated in 1885, named for Long's Peak, a nearby mountain feature. A planned community laid out by Chicago businessmen.
Louisville: Incorporated in 1882, named after landowner Louis Nawatny. (the s in Louisville IS pronounced.) Coal mining town originally, it now regularly ranks as one of the top towns to live in the US.
Niwot: Platted in 1875. Named for Arapaho Chief Niwot (Left Hand), who attempted to interact peacefully with early settlers, but was killed in the Sand Hill Massacre of 1864.
Superior: Coal mining town, founded 1896, incorporated 1904, the coal in this area was 'superior' to the soft coal being mined along Coal Creek (Erie, Lafayette, Louisville, etc) and so proudly named.
Westminster: Settled in 1859, incorporated in 1911. Previously called DeSpain Junction, Harris, and Darell Park. Finally renamed after nearby Westminster University. Gold mining town.
March 9, 2013
It's been quiet here. We've got a contract on a house and should close on March 18th, so I've mostly been in waiting mode. It's a big, lovely house, almost twice as big as our townhouse. It's going to feel bare for a while until we begin buying more furniture. We're going to need a lot of seating - and more bookshelves!
There's plenty of bedrooms. I can have a guest room AND a craft room. I had been planning on combining the two so I'm really rather excited. I won't have to share the space with storage items since there's also a basement!
So while I've been waiting, I've been planning. Subtle cowboy/western themed guest room in earth tone colors. Probably a stagecoach valance. Not sure about the rest, but I want to make it so cozy that even I would want to sleep in it. It will all depend on what I find. Hopefully the movers packed the duvet cover I had in my old room - I can reuse that and finally use my Indian blanket, too. The walls are white in there, I'll keep it that way for now.
The craft room is what I've been obsessing over. How do I do storage? I have a lot of items that are unrelated, will definitely need more shelves, and may have to rethink the storage I have now. I have to write it down at this point, so you're going to get my thought processes here. Firstly is an inventory. Of what I can actually remember. Feel free to skip the next section until I get to my conclusion, if any.
-------------------
I have a lot of fabric. I packed it in big tubs for the move, but I need it to be visible so I'll use it. I have a mix of scraps and fat quarters for mini related, and then yardage for full size items. At first I thought cube shelves would be best, but now I'm thinking that would be awkward in extracting fabric, and would want cubes with a shelf in the middle, which is hard to find. Bed, Bath, and Beyond carries a cube storage set with additional drawers and dividers, but I want to go up high with storage, and they're not stackable. (they had them in store, there's an option to buy the shelf with some storage items.) So maybe a regular shelf would work better. The problem with THAT is most bookcases don't come with enough shelves for my needs. I may have to write and ask the company to send me more, or have some cut.
Another option would be to hang the bigger cuts of fabric. There's plenty of closet space! There's also plenty of hangers at the thrift shop, 10 for a dollar. I could also rig up a clothes pole inside a bookshelf.
Before I moved, I shoved a lot of stuff into Michaels scrapbook bins. They're plastic with a hinged lid, about 14.5" square, 3-4" high. I think I bought 6.
2 of scrapbooking paper
1 of wood scraps
1 of felt
1 ribbon and trim
1 of beads and jewelry findings
They work best for the scrapbooking paper, and I guess for the felt, although I bought some larger pieces that take up a lot of room. The wood scraps could go in anything, but the ribbon doesn't really work very well in it. I wasted quite a bit of time rewrapping some of my ribbon onto smaller spools to get it to fit!
I also filled 2 plastic shoeboxes full of acrylic paints, and 1 of various sized bottles of glue. I have a small wooden box for my Xacto knives, and I think I also filled 1 shoebox of scissors and other cutting devices. (I'm going to need to buy a new mitre box.) Rulers and tape measures have always floated freely in the chaos. I never found a home for the rubber stamps I impulsively bought. There is plastic canvas and large stencils that will also need storage. I left the fimo clay in the sterilite drawer, which would fit in another shoebox, along with the clay/pasta machine. Which reminds me, I also have the clay oven.
And then there's all the miniatures stuff. Hair, stuffing, chenille stems, porcelain parts, etc for dollmaking, a ton of furniture and accessories, electrical supplies, wallpaper (currently saran wrapped to the basement floor of my turnabout house attic) and lots of finished dolls. I also have dolls that need to go on display, ranging from 1/12 scale to 1/6 scale to whatever scale Gene is. I sold most of my Genes but I still have the one whose face I repainted. Mainly because I still want to design doll clothes.
Oh yes, and two dollhouses that both need work.
I'm not done! I have a sewing machine, and all the accouterments that go with it. Needles and thread, bobbins and feet, the iron and board and hams and so forth. Fortunately most of this is really tiny (I threw it in a bag in a Sterilite drawer) or else really big, and already has a designated home on the back of a door. (I can't tell you how glad I am that I didn't bother to throw away the sewing machine box and packing.) Also a shoebox full of sandpaper and a hand sanding machine.
Michaels sells a shelf set to hold up to 7 of the scrapbooking bins, but at $80, I can't justify the cost. (for $89 I could get a 6' Closetmaid closet shelf that's roughly the same width but twice the height, plus three clothes poles, which would be great for wrapping paper and ribbon.)
I bought the shoeboxes en masse at the Dollar Tree. I don't really like them as the lids aren't secure, but since I was taping them all shut for the move I felt it didn't matter. I also don't like that they're more designed for stacking inside each other and I feel that's a lot of wasted shelf space. I want something squarer!
Also random stationery and office supplies, wrapping paper, and computer related stuff that maybe I can sneak into Brian's office supplies, as I haven't touched it in three years.
I have two 7 drawer Sterilite drawers. I HAD three, but gave one to my mother before the move. I had been storing things in there, like the wood and the beads, whose collection had grown too much to fit in the drawers, and I wanted to keep them in a single container. One of them I managed to empty for the move, as they were mostly holding miniature accessories. If I can get my houses back together all of those items can go in the houses and free up the drawers. That will take a few months at least. In the meantime, all the mini stuff is in shoeboxes. I also have a couple of mismatched drawers, one that's three drawers for paper and two others that are just single drawers, and a Closetmaid type shelf that's 12"wide by 24" high. And a banquet table. A choice of two different sizes, technically.
Oh, my craft books. I want those on hand. There's a lot, but I'm not sure exactly how much, as I also had my comic books mixed in. (Those can go in the guest room. What better way to spend the evening adjusting to a strange bed in a new location than with Calvin and Hobbes?)
-----------------------
So, my storage is mostly shoebox sized, scrapbook bin sized, lots of fabric, and stuff that can go in a few drawers. Are there shoebox cubbies? I don't think the cube shelves are the right size, and I'd like to avoid spending extra money just because I don't like the angled walls of a cheap shoebox.
I'm wondering if it would be easiest to go back to my old standby of hanging shelves. Y'know, those metal strips you attach to the studs in the wall, and then slip in the metal brackets for the boards? I didn't do that in the townhouse because we didn't trust the walls, which were literally shared with the neighbors due to stupid building, so I totally forgot about this option til now. This leaves me floor space for the dollhouses and/or the banquet table, or the sterilite drawers and the option for hanging fabric. It's inexpensive compared to floor standing shelves and highly customizable. They can take quite a bit of weight, plus I can also add more work space! Not the sewing machine, of course, but I was hoping to jut that out into the center of the room under the light anyway. I can also add lighting.
OK. This will work.
February 27, 2013
Now that I have my car I get to drive around. Driving, too, is different!
 First, stoplights. In Virginia, the turn lanes normally go first, then straight traffic goes. Here, straight traffic goes, and then turn lanes. At least at the stops I've encountered. It's funny how your body reacts when it expects something else to happen. Wait, I'm supposed to go now! Why did you forget me? Oh.
 Boulder also makes a lot more use of angled right turn lanes than I saw in Northern Virginia. With the little triangular island and everything.
 |
| I was confused for a while. |
One parking lot I used had one entire side as compact cars only. It was obvious who ignored it!
I was afraid I'd be much more concerned about bicyclists while driving, but so far I've only seen a few, and they've all had helmets. I guess only the hard core bikers are out in this weather! We'll see what happens in the summer.
February 24, 2013
 |
| Tiny bits of this mountain range has names. |
And here I was, thinking I would just need to learn new streets and communities! This will be a problem. I look at mountains and just see a rough and tumble skyline. What, exactly, is a peak? Where does it end? Where does it begin? The only peak I could ever identify in the mountains at home was Sugarloaf, and that one's kind of obvious.
Obviously I need some sort of peak identification guides. So I poked around the internet.
Here's a breakdown.
There's five major mountain ranges that make up the Rocky Mountains, at least in the western US: the Front Range, the Sangre de Cristo Mountains, the Park Range, the Sawatch Range and the San Juan Mountains.
The easternmost range is Front Range, and runs from central Wyoming to lower Colorado. Front Range is broken up into three sub-ranges: Northern , Central, and Southern Front Range, which are also broken up into even smaller sections, if you can consider ANYTHING about the Rocky Mountains 'small.'
Boulder, CO is located on the plain, butting up against the foothills and the Northern Front Range, so the peaks in this area are the ones you'll most likely be seeing when driving around Boulder. SummitPost.org has a great summary of the breakdown of Front Range and what areas of interest can be found in each section. I even found an awesome labeled image detailing specific peaks of the Indian Peaks Wilderness! (scroll the image to the right to see more.) I added some of the peaks on my Living in Boulder map (the green trees) for a visual aid in understanding where the mountain peaks are.
I don't know if any of this will make any sense until I try it. I posted a picture up top, but I don't really know where I was when I took it, other than somewhere in Roosevelt National Forest, on our way to Eldora Ski resort. The rest of my photos are probably of the foothills rather than the mountains, and I haven't found out yet if the peaks on the foothills have names. Or if they're even considered peaks.
Fortunately I don't have to learn a LOT of new names. The roads and towns reflect the names of the mountains and peaks!
February 20, 2013
Last August I found some code that would allow me to pull photos and captions from my Picasa album and post them on a simple page I created for the purpose. Picasa's made so many changes and complications from what it used to be that I was finding it more and more difficult to navigate and share. I finally got to playing with it again today and was pleased to finally make a page with exactly what I wanted.
Now I can create a simple page to display a new album in less than a minute.
Here's a sample!
http://www.oneluckybug.com/bermuda.html
And another:
http://www.oneluckybug.com/ourwedding.html
I'd still like to see if I can figure out a way to get them all to display on one page. I'll have to think about it.
Subscribe to:
Posts (Atom)