RSS Feed


 Posts
All Comments
Posts
All Comments
Showing posts with label Bags. Show all posts
Showing posts with label Bags. Show all posts
July 25, 2014
Mary Poppins' carpet bag is an amazing thing. It's the quintessential Bag of Holding, similar to the one Hermione Granger had. And of course I decided I was going to make it rather than buy it, because I like making bags.
Previously I had complained that I'd made a bag too small. I had the opposite problem this time! I based the dimensions loosely on a bag I'd gotten at Disney World that has proven ideal for overnight trips. That bag was 14"x14"x6". Of course, sometimes when I'm packing it, I wish it were JUST a little bigger, so when I made this bag, I did so. It's HUGE, but I don't feel it's THAT much bigger! I made it roughly 18"x14"x7". It's just a basic oversized rectangle (an extra inch all around for 1/2" seam allowances) with squares cut in the two bottom corners.


I found the fabric as a remnant at Hancock Fabrics. Isn't it gorgeous? 7/8 of a yard proved to be PERFECT. I paired it with a fake leather knit-type fabric from JoAnns.
The fancy thing about carpet bags is that they have a large purse frame around the opening. I couldn't find one big enough in the time frame I had, so I faked it with some 1/4" strips of basswood - heavy duty stuff that took forever to cut by hand. Then . . . I glued heavy duty magnets to it. The first set proved to be not quite so heavy duty, but I eventually found ProMag Neodymium Magnets (Super Strong - Not a Toy!) at Michaels.
I made the handles myself, from a Russian blog post. Thank goodness for Google Translate! I used felt to line it, and found it bunched up oddly inside, which was a pain to work with, but it worked out well. So far it's nice and comfy to hold - I haven't done a weight stress test on it yet. For when I do get tired of holding it, I included two rings inside to clip a shoulder strap to. Also inside is a hanging pocket for little items I want to have easily available, particularly my wallet and cell phone.
I messed up horribly on the interior, but I'm hoping no one will look.
The bottom is strengthened with a rectangle of illustration board, and I've attached six small purse feet. I probably didn't NEED those, but they really jazz up the bag.
You also may notice the little rectangles sewn on the bag. Those are for straps which I haven't made yet, which I hope will help distribute the weight properly when the bag is full, and also help keep it closed. I wanted to use this bag for Victorian type cosplay, which meant no visible magnets, or zippers.
This was my inspiration piece:

Here's a blurry costume preview:

Still left to do - add buttons to the blouse, finish the hat, make bag straps!
Now, what should I put IN the bag? Spoon, sugar, measuring tape, medicine bottle?
July 18, 2014
I made this two years ago for my cousin for Christmas. I'm surprised I didn't post it! Also disappointed that I didn't take a picture of the interior.

I thought about it because A. It's her birthday today, and B. I'm now attempting to make a similar bag for an upcoming project.
I thought I started with this Everything Bag tutorial, but obviously I didn't finish with it. I'm thinking it might be this tutorial from Poppyseed Fabrics, simplified. It's possible I stared at the directions for both and then combined them somehow. In any case, I hope it's still in use, and that my cousin has a happy birthday!
June 3, 2013
I've gotten totally hung up on how to write about my jewelry box revamp. I don't want to post pictures of my jewelry online, even if it isn't expensive, and I also don't want to dismantle the whole thing to show you, so I'm going to just do a very long 'there is too much - let me sum up' post and show you the awesome things I've produced since moving to Colorado. (It's so nice to have a big craft room!)
1. The Jewelry Box. (un-illustrated until I make up my mind)
I spent my days in the temporary apartment plotting how I would do this. I have a lot of pendants, and wanted to just see the pendant part. In most jewelry boxes, (which only seem to think that the average woman owns only 6 necklaces) you hang your necklaces up, and the pendant part ends up lost at the bottom somewhere. How am I supposed to know which is which? my jewelry box is a large rectangular piece with two doors on the front, which has three hooks on each side and a little cubby box at the bottom to keep your jewelry from getting caught in the door. On one side, I removed the hooks and instead placed a number of rectangular squares of wood about 1 1/4" tall and long enough to fit snugly within the door. I cut notches in the top of each, although I don't think it's actually necessary. I drape a necklace chain over the top, chain dangles down the back, all I see is the pendant. At the bottom of each rectangle I plan to glue a thin layer of fabric to keep each row of necklace chains separate, to prevent tangling.
I also put in a narrow square pole in the interior to drape my bead necklaces and other items too bulky to fit in the door. On the right hand side I took a square of fabric similar to cross stitch fabric, only the holes were much bigger, and installed all of my earrings. I mostly wear studs, and now I can easily see them all! My rings left their DIY box and moved back in to the ring drawer inside the cabinet. Pins got tucked in to other areas. Everything's so nice and easy to see!
2. Shower Curtain


3. Mountain Paintings
 |
| Work in progress - but shows the colors properly. |

The same bathroom is long and narrow and BEIGE, and I wanted a series of pictures to fit that narrow space and break up the blah. I was inspired by a set of three vivid paintings by Don Li-Leger that I found online, but felt they were too big for the space. I picked up four 8" canvases at JoAnns (they were half off, too!) and proceeded to paint my own! I picked the colors to go with Plan A shower curtain, otherwise I would have done something floral. Instead I tried to imitate the mountains from this photo by James Bo Insogna.
4. Rainbow Crocodile Stitch Scarf

This is my travel scarf. I worked on the majority of it in trains and on planes. It's so soft and everybody seems to love it. Once I figured out the instructions it wasn't difficult at all, just very, very repetitive. (I was doing it left handed, too!)
5. Hobbes


You know you've always wanted one. I found a pattern on Instructables and tried it out. It came out . . . OK, but it will be a while before I want to do hand stitching again! I kept trying to come up with ways to make it easier to do, and may try them out one day. I could NOT find black oval buttons. I even bought a brown/wood pair and tried painting them, but they just looked like painted blobs, so I went with round instead.
6. Peasant Blouse and Skirt

I needed something to go with the bodice I bought from Olde World Wardrobe at the AnomalyCon earlier this year. I found a simple peasant blouse pattern and a long skirt pattern that was NOT in the costume section of the patterns, and made these up. Nearly instant wardrobe! I think this will be adequate for a Ren Fair, right? Except the hair thing . . .
7. Hip Bag


I made a fancier version of my hip bag. I iddn't bother with the card pockets this time, just one fabric divider in the center. I tried to make it all one piece, but got SO confused because I forgot how i turned it right side out! Oh well. Maybe I'll be happy with the NEXT one . . .
8. Willowcrest

Yup, I came back to my sadly neglected Willowcrest. I've spent most of my time smearing wood filler everywhere and trying to smooth things out, but I also rebuilt this extension for the third time. (I can already see the roof is going to need more attention!) My next series of posts will be covering my progress. I redid this section, and am currently working on extending the front porch in between smears. My future plans include redecorating the entire interior, a new front door, a new kitchen, rewiring (possibly with LEDs) and landscaping.
There! I think I've remembered everything. Now I can move on.
October 27, 2012
Having used my bags repeatedly now, I've come up with some alterations.

Too small, which is frustrating, especially after looking at this photo and thinking how big it looks. IT'S NOT! I think I can fix it by adding fabric to the bottom, and I actually have fabric that will work with this. So . . . I'm going to take it apart and do so. Fortunately I don't have to take apart the difficult bits at the top.
 The Hip Bag
Having used this on two cruises now, I love it. It's not quite big enough for everyday use, though. I'm trying to come up with a small list of alterations. This WAS, after all, only supposed to be a prototype. However, I'm not going to alter this bag, but just make a new one in nicer fabric. (and I found some nice, nice fabric. I can't wait to see how it turns out!)
First, it needs a proper belt that's a little easier to remove. My biggest problem was trying to get out of the silly thing when I needed to run it through the security machine whenever reboarding the ship. I simply had it strung on a cord with one of those squeeze pins to keep it around my waist. I had thought my design would allow me to use the bag as either a shoulder or a hip bag, but I found I much preferred it as a hip bag. I was considering parachute clips, but I'm not sure how easy those are to find in the size I want them to be. I think if I add two rings to the bag and get some swivel snap hooks, it will work just fine.
It needs to be just a LITTLE bit wider. A little annoying since I'll have to cut a zipper down to size, but I just can't fit a full passport inside it.
I need more card storage if I want to use it everyday. I only had the very basics on the ship, but running around during the day, I'd need room for the additional store cards, library cards, insurance cards, gift cards, and the metro pass card I normally haul about.
My husband has been carrying around an aspirin tube in his pocket and just mixing all his pills inside. I'm thinking instead of installing a zipper pouch in the next one, I'll put in a little pocket in the inner corner to hold a similar tube. I've got one in there now and it fits OK. I can always pick up pepto bismol in pill form rather than the pre-wrapped chewables. Although a zippered interior pouch would be nice for loose change. Perhaps I should install an exterior one on the back?
The formal wristlets I just made worked fine, although they could probably stand to be a little wider, too. The owl already came loose so I'm going to have to reattach it in a new way.
Finally, I'm happy with the flap, but I need to attach it to the bag at both ends. Lots of choices for this. Buckles? snaps? a button? slot and tab? We'll see what happens.
October 5, 2012
Here's the next evening bag, made with leftover fabric from my clockwork doll. The pattern is based on Amy Cornwell's clutch tutorial.

The jewelry finding is an earring. It looked ridiculous in my ear. The other half is now a necklace.
Slippery fabrics are hard to sew. Must be more careful next time to lessen the sloppiness.
October 2, 2012
I'm slightly disappointed. I needed a BIGGER purse, not a smaller one! I can barely fit my basics inside. I do, however, like how nicely it fits under my arm.
I'm not sure I could have made it much bigger in any case. The brown corduroy is made from an old vest I found at the thrift shop. It proved to be a much nicer fabric for bags than vests! I have just enough left to make a wristlet.

September 26, 2012
I tend to lean towards bright, cheery patterned bags and purses, so the other week I went to a wedding, and realized that I didn't have any 'formal' handbags. I wanted something tiny that would hold only the very basics: cards, cash, cell phone, a tissue, keys and a few allergy pills. I ended up using the turquoise leather mini-purse I had bought to throw in my backpack for school.
I certainly looked at bags and clutches. I stared at simple little wristlets that had a price tag of $98 and wondered why $3 worth of materials could be inflated so much just by adding someone's name to it. Something in me also snapped. "I'm never going to buy a bag again! From now on, I'm MAKING them!" I heard myself say. Custom designed originals by Elaine!
It's all in the fabric choices, I realized. Buy a quarter yard of the nicer fabrics, raid the remnant bins, and invest in a few zippers and D rings and those magnetic clasps.
Fortunately I found a really cute pattern on Noodle-Head through Pinterest. They used cutesy fabrics, but I could see the potential for a more formal look. It was quite easy to do and customize to my own needs!

I had been hoping for more of a brocade, but could find none in black, so went with the black, silvery glitter knit. The owl was left over from the Owl Bag endeavor, and seemed to insist that it went perfectly. The interior is a satiny silver. I have enough fabric left over to make two or three more! Again, I made it JUST big enough to hold my passport, and once more, I have a hard time getting it through the zipper. Just a quarter of an inch more is all I need!
I have a lot of leftover orange silk from my Clockwork Doll project. Guess what I'm making next?
May 18, 2011
I also found a belt strap at the thrift shop that goes ok with it, although it's a little thick, and looks pretty ridiculous as a purse strap, now that I come to try it. While I was there I picked up a cute little NWF book bag for 50 cents. I couldn't resist. It's not often I want to advertise a company, but they were good to me, though they didn't share many samples. ;-) A year or so ago I found TWO NWF travel bags at the same thrift shop and bought both. Excellent design, lots of room, and even a water bottle/umbrella holder on the outside. I'll be taking one along on the cruise for land excursions.
May 17, 2011
Having been successful with not one, but two owl bags, I decided I was going to branch out and design my own bag.
I wanted a hip bag, not the bulky fanny packs of my childhood, but something sleeker, streamlined. It would hold EXACTLY the vitals and nothing else. What are the vitals? Stuff I would likely need on our upcoming cruise without having to deal with a purse. I couldn't find a pattern that satisfied me, but found enough information online that I felt confident in doing my design. I wanted it just big enough to hold my passport, phone, camera, credit cards, loose change, and maybe a few bandages and pepto bismol pills.
I designed and designed and designed in my head for ages as I struggled through finals, and dashed to the machine as soon as I had finished. What I ended up with . . . was more or less what I planned. I just don't like it!
 |
| Camera fits, couldn't get it in the photo! |
Surprisingly, even measuring twice didn't help. It's STILL too small, but I was still able to wedge my passport inside. Everything else fit inside with it, so I'm calling it good for the moment.


I need to get cording or a small belt, and quickly, too, because the scarf doesn't go so well with it. The way I designed the straps on the back, I can wear it over my shoulder or around my waist. I could probably add a smaller strap and make it a wristlet.
I also need to do something to it to make it look more like a purse and less like a pillow.
Things to remember for the next hip bag: make it even wider, use less interfacing, and try once more to make it flat bottomed.
May 14, 2011
 |
| Inspiration Bag - visit her blog! |
 | |
| My finished bag |
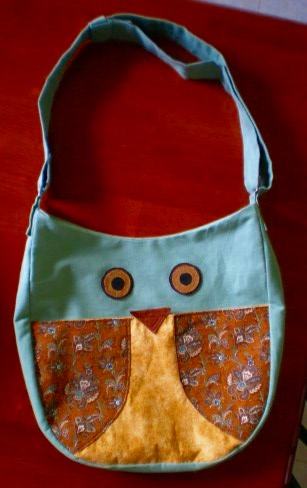
I bought buttons to use for eyes, but they turned out to be too small. (No one likes a beady eyed owl.) An image search for owl eyes turned up beautiful amber stares, but I couldn't get any fabrics that worked properly without seeming too weird. Eventually I found the right golden shade in my own stash to use as eyes, but it took a lot of tries. I then decided that it would be a good idea to use four layers of fabric: black, brown, gold, and black to define the eyes properly. It's REALLY hard to cut out a cloth circle! Eventually I used iron-on interfacing, after failing twice to come home with the right double stick iron on whatever it is I needed. Yes, I glued the eyes together and on the bag. If they fall off, glue them back on, please?
I made a few changes to the original pattern. I separated the front panel, wings and body, to make into a pocket. The body fabric was folded in half and cut out, with interfacing on one side for added strength. Pull on his beak and it opens! I also altered the inside of the bag, making the top three inches of it the same fabric as the outside. (The rest is a soft tan colored fabric. Possibly challis?) For the strap, I used D-rings, and found a tutorial at Sew Loquacious that allowed me to make a fabric slide so the strap can be adjustable. I couldn't find the right kind of metal part to do this, at least, not big enough. If it doesn't work well it will be really easy to undo.
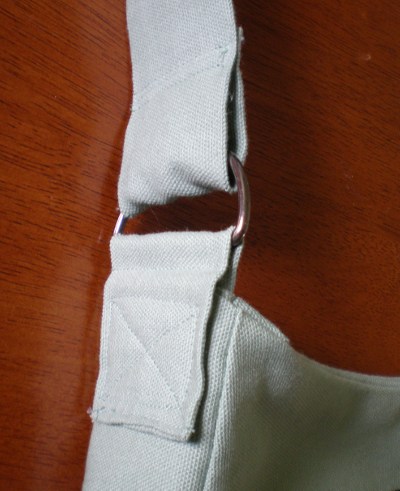
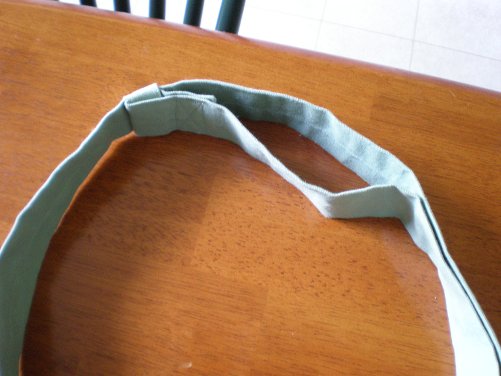
The instructions were excellent and I had no problems with assembly. I drew out the owl on oversized paper and then drew all the parts on separate pieces so I wouldn't have to cut it apart. I added a seam allowance, just in case.
 |
| Owl Bag, Jr. |
Fun, fun project! Now I'm experiencing a small bag-making addiction and making plans for two or three others.
Subscribe to:
Posts (Atom)