RSS Feed


 Posts
All Comments
Posts
All Comments
February 7, 2015
I haven't done a lot of crochet this past year, and it's all the fault of an afghan.
I get much colder at night than B., so I have a throw for my side of the bed. It's a basic no-sew, fringed and tied end fleece blanket that I've had for ages. It went much better in my previous bedroom with its rustic style. It looks downright silly on a Chippendale four-poster.
 |
| My book doesn't actually look like this. |
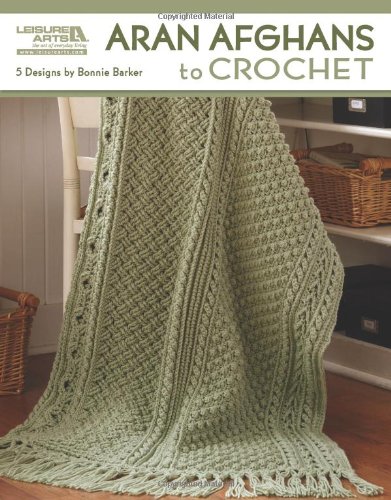
I particularly liked this book for the way it gave instructions. It would specifically label sections, i.e. (cable row) so you could conceivably combine different stitches and make up your own pattern.
I went with the Basketweave afghan, although I initially bought it for the Sampler afghan. Sewing together sections of crocheted yarn is annoying, so I moved on.
I'm terrible when it comes to reading crochet instructions all the way through. I figure if I don't know a stitch, it will take me five minutes to look it up and figure out how to do it.
 |
| Really, I should have stopped here. |
About this time B. got interested in the project. He liked the look of it. He suggested that I make it big enough to cover the bed. The big, huge, king sized bed that comes up to my waist and is fondly referred to as the Monster Bed. I resisted, but he kept suggesting, and so I modified my pattern again. I bought more yarn. Then even more. I had to wait and ransack various Walmarts because they generally only carried 4-6 at a time, and apparently the had exclusive selling rights on that particular color, because it was the only place I could find it.
The afghan got bigger. And heavier. And harder to maneuver. Eventually I stopped working on it, because I'd had a molar removed and was exhausted and achy and recovering slowly, and it was just too hard to deal with. Plus the weather was getting warmer and I was sitting under a ridiculous amount of yarn.
I didn't attempt to start any other projects during the year because 'I still had that afghan to finish.' (I did knit a few hats.) Finally in January I hauled it back out, and finished it in early February 2014.

 |
| That center panel is an example of the 'Celtic Weave' |


When I was a foot from the end, I came to the horrible realization that the celtic weave panels had really messed up my stitch count. Yes, that's another bad crochet habit I have, not double checking how many stitches are in a row, but when you have to count up to 241, you don't want to do it often. Fortunately I was able to tug it all straight for the photo! You can also see it isn't long enough to cover the foot of the bed, but that's because it wasn't meant to when I started it. I don't like fringe, and I really don't want to have to come up with an additional panel, so I'm just going to call it done.
You want to know the stats now, don't you? I haven't measured it, but I did manage to make it hang down to the side rails on the bed, so it's at least 110" wide. I lost count early on of how many skeins I used. So after taking these pictures, I was crawling around on the bed for a good half hour, searching carefully for where I had woven in a new skein to the old and tying bits of red thread around the spot. I came up with 36 skeins. That's roughly 9,000 yards, or 27,000 feet of yarn. Each skein is roughly 5 ounces, so the whole things weighs a touch over eleven pounds.
It's nice and warm, and I no longer have to move it, or really look at it. And eventually I will find a bedspread for underneath it that I like and actually fits properly, and get a dust ruffle made, since one can't be had for a decent quality and price.
In the meantime, I'm going back to hats and scarves and amigurumi and other stuff that travels easily, or at least can be carried up and down the stairs without issue . . .
February 3, 2015
Well, didn't that month just fly by! Things got a little crazy, and very little crafting got done. Why?
We attacked the kitchen. It was time.
Here's the kitchen from the online listing, right before we moved in.
 |
| Before! |
 |
| The island didn't stand a chance. |
Then we went appliance shopping. As best we could tell, the appliances that came with the house have been there since it was first built, and all almond colored. I personally didn't care so much about the color, so long as they worked right, but the dishwasher was on its last legs and oozing muck and not cleaning dishes properly. The stovetop had two settings, 'not hot enough' and 'BURN.' The microwave was a spare one B. had bought during his brief time working in Charlotte, was underpowered and tiny, and taking up space on the counter. The counter? In surprisingly good shape for laminate, but we were missing our black granite countertops from the townhouse.
 The sink? Surprisingly not almond, but I was also missing the huge, deep composite sink with the combo faucet/pull out sprayer we'd had in the townhouse. I freely admit I do not understand double bowled sinks even after looking up hand washing methods for dishes. It was not my style. I wanted to be able to lay my Pyrex dishes flat to scrub them! Fortunately this was apparently THE time to replace stuff, and we got some really good deals on the appliances we picked out.
The sink? Surprisingly not almond, but I was also missing the huge, deep composite sink with the combo faucet/pull out sprayer we'd had in the townhouse. I freely admit I do not understand double bowled sinks even after looking up hand washing methods for dishes. It was not my style. I wanted to be able to lay my Pyrex dishes flat to scrub them! Fortunately this was apparently THE time to replace stuff, and we got some really good deals on the appliances we picked out. 
 We'd contacted contractors before and had dismal success in getting them to commit to installing gas lines and range hood vents that vented outside. These were things that needed to be done before we replaced the electric range with a gas range, and ultimately the reason it took us so long to get to the renovation. This time, contractors showed up, gave reasonable estimates, and then did not fall off the face of the Earth, but came back and got the work done WITHIN A WEEK. It was shocking, and we found ourselves rushing to keep up. We actually had to beg the granite people to come later, because we had appliance deliveries the same day they wanted to arrive!
 We had to eat out a lot in the end, which is not fun when there's not a lot of allergy safe places to eat. I think the people at Mumtaz know us by name now!

 We also decided to rearrange some of the drawers, and I took the opportunity to add some little-used items to the donation box. I am still attempting to find new homes for some items. I also took the opportunity to replace all the brass knobs with some silver colored ones, which seemed to go well with all the grey in the granite.
It's now February, and the chaos is still ongoing. The new granite is about 1/4" thinner than the old laminate counters, which means the appliance garage now has a 1/4" gap between the counter and the cabinet above. I am working on fixing that with wood strips, but having issues with matching the stain. Eventually we will have to replace the backsplash because of the thinner counter issue, but right now it will do. Meantime, I have boxes in the dining room with stuff that belong in corner cabinets.
 |
| The new granite counters go well with both the cabinets and the appliances, but this irritates my desire for uniformity. |
There is still more to do, of course. We have yet to address the lighting issue, and as you can see from the first photo, it's a big, ugly one. I have holes to fill and grout to clean and a backsplash to design and install, or have installed. Since we made the island countertop bigger, we may end up adding brackets to help support where it sticks out over the one end. There are things I need to learn to ignore and not scrub at endlessly, as in the picture to the left. The towel hanger is more frustrating than useful. The pantry is ridiculously designed. It's a four foot wide pantry with a two foot door smack in the center. We want to rip out that door and install two double doors so we can easily reach everything in the pantry instead of having to shuffle items in and out of the way to get to things on the edges. We're exhausted so I think those projects are going to get put off for a bit.
Hopefully now I can focus on some smaller projects I had started before I realized the kitchen was actually happening!
Hopefully now I can focus on some smaller projects I had started before I realized the kitchen was actually happening!
December 21, 2014
December was always my favorite mail sorting time of year at work, because of all the beautiful and unique cards that came in, often from all over the world.
Several stood out to me in particular for their reusable qualities. The best was a card that had live seeds embedded in the paper, and the recipient could tear it up, plant it, and enjoy their card in the form of flowers come Spring. There were also several cards that doubled as ornaments, and I loved that. So much so that I was determined to make my own. I finally got around to it this year. I started in August, because I had absolutely no idea what to make, or really how to make it, until I could see the available materials.
Eventually I found these chipboard shaped ornaments in the holiday craft section at Michaels, way back with the minis.

I had some lovely heavy Christmas scrapbook paper in my stash already, because I've been planning this for ages. Then it was a matter of tracing the shapes onto the back of the paper and cutting them out. I was able to get two shapes out of one card for a classic ball shape.

Then I cut out two sizes of long ovals using a template. I even found some stamps that were appropriate for the 'inside' of a holiday card, and stamped that on the back. I used a shiny gold paper I found at Michael's to cut out the hangers on top of the cards.

 |
| Pile o' card ornaments |
I just realized I forgot to make one for MY tree. I guess I should go get on that!
November 20, 2014

The microwave isn't done yet. Still need to smooth out the handle, attach the front, attach the control panel, and make a vent for underneath, and decide if I want a turntable inside, and what to make it out of, if I do.
I had issues finding a good image for the button panel until I thought to look at microwave manuals rather than actual photos of microwaves. There was a possibility that there would be a simple line drawing inside for reference, and I feel quite lucky in finding this particular one! It printed out quite clearly on photo paper.
I came to a screeching halt on the rest of the kitchen. I accidentally gouged the oven back while trying to sand it smoother (my own fault for using cheap balsa), and while digging through my lighting stash, realized with horror that I DID NOT HAVE LIGHTS for the kitchen. I kind of do, but one got relegated to another room, and I just wasn't happy with them in the first place to buy more.
Plus, with the modern kitchen look, I realized that it would be weird to have anything but pot lights/recessed lights in there. Problem is, the ceiling isn't thick enough to install the cannister lights available in miniature, and because of the new cabinets, I really can't lower the ceiling enough to put them in.
 I had to think for a few days about how to do it, and finally, hopefully, found a solution at Evan Designs, which I should be able to hook up to the 12 volt wiring system currently in place. If not, there's plenty of places to hide batteries in the kitchen. They had a nice little set of four lights wired together to one resister. I could make a narrow dropped ceiling and run the little lights freely around the kitchen. I wish they came in a set of six, but then I realized I could use the extra two as under cabinet lighting. I plan to cut holes in the ceiling and cover with vellum or something similar for the recessed lights. I will post updates on this as they happen. Which reminds me, I still need to hook up the hall lights to the system!
November 10, 2014
Surprisingly, I found what I needed for the cabinet doors at Michael's.


Check out these fancy head pins! They were a little over 3mm wide at the tip. And really hard to photograph.

And also awkwardly shaped. Some were round, some were oval. Not sure what's going on here, but I think they look just like custom pulls. I am still debating whether or not to try and make them darker or bronzier. I am thinking of leaving them as they are, mainly because I'm going to have to make the kitchen faucet out of FIMO and I'm pretty sure I have a steel colored metallic clay, but not bronze.

The varnish is dry, the holes are drilled and I was too excited to glue the pulls in place, so I will do that tomorrow, along with further work on the microwave and maybe the fridge. But here, have a few preview pictures!

I was liking the look until I realized I had achieved 'golden oak.' I hate golden oak. Now I'm annoyed, but they look so realistic anyway I'll probably keep it. Typical modern builders grade cabinets, right? I am still divided about adding pulls to the faux drawer right below the sink. I can always add them later.

Now if you have been following along and thinking, 'wow, those top doors are pretty high,' I thought of it too, and found a solution for that! A mini step-ladder! It actually folds up, too.
November 9, 2014

They might not be as badly designed as ovens, but miniature microwaves available for sale were pretty sad. I found one that might possibly have worked, and it was black and had a cord, which can be an exciting detail, but not for a hanging microwave.
This was pretty easy, since I didn't attempt to make it open. Firstly an online image search for 'range microwave' until I found a design I liked and felt I could imitate. I made a box of out illustration board, with an interior wall just inside the microwave door. (I'm thinking about sticking in a 'glass' turning tray inside.) The entire front s one piece with a window cut out and lines created with embossing tools. I carved a handle out of balsa, although I could have gotten away with just the inline push button on the bottom right, but after carving the two handles for the oven I was feeling pretty confident about it. I used posterboard to add some 3D detailing to the front.
I'm enjoying the detailing, but it gets complicated. The top bit of the microwave gets venting, which I need to figure out how to do, and also buttons and the display on the right side, which obviously I haven't even attempted on the oven! Plus I'm aware that there's more venting or SOMETHING on the bottom, for which I need a fine mesh.
But just looking at this unfinished picture pleases me. I have a realistic looking microwave! The original one was a plastic kit that was so old it came with a wood paneling sticker for around the sides. I peeled it off finally, but it didn't help.
I have the feeling the kitchen's going to be my favorite room.
November 8, 2014

After painting the doors, I decided to try a little antiquing. Wipe on, wipe off FAST, and hope you got all the crevices highlighted. Messy, very messy.

It turned out a bit darker than I would like, and I once again made the mistake of thinking, 'oh, it looks good, but this little spot right here could be better, I should . . ." NO. I should not. Let it be. Don't overwork it. Too late for some pieces, but that's the nice thing about antiquing. You can forgive a lot.
Right now I'm waiting for the glaze to dry, and then I get to add a gloss sealant. Then I glue the doors in place. In the meantime I should start building that microwave and making a decision about the drawer pulls.
November 7, 2014

Slowly getting my doors and cabinets painted. I'll do several thin coats and some careful sanding, and probably a little decorative antiquing before applying a sealant.
While waiting for the paint to dry I tested door pulls. I just want something simple, so went with things I had around the house. A ball head pin, a sewing pin, and a map pin. Ball pin (about 2mm) was too small, but the map pin (4mm) was too big. I also feel like the sewing pin is a little too small, too, so I need to find something round and holeless about 3mm in size. I think I'll need about 2 dozen. That's a lot of hardware! I'm kind of glad I don't need hinges, too!
(Don't worry, I have a piece of wax paper over my cutting mat!)
November 6, 2014
Short post, just to show you I'm still keeping things simple and still working.

I've made doors and drawers for the lower cabinets and replaced the fronts on the larger cabinet, as well as added wood to the recessed area underneath. What are those, kick plates?
Unfortunately I just noticed a tiny dent in the countertop. That's what I get for choosing a wood based on its fine grain rather than its hardness. I don't think I can undivot it, and I don't want to take it apart again, so maybe I can just distract from it.
Tomorrow I will paint!
November 5, 2014


Little steps, specific goals. I'm going to try to stop thinking of it as 'finish the kitchen' and start thinking 'tomorrow, I will add molding to the doors.' Which is actually what I did today. And then I STOPPED. Tomorrow, I will make doors and drawers for the bottom cabinets. I want to paint them a cream color, but I can't seem to find the right color. so possibly the day after, I will mix and play with paint until I get it right. The doors in the photos are still not attached to the base, because I have to paint. Hopefully I can get them straighter. Eventually I need to decide on handles. My townhouse kitchen cabinets didn't have any, so not having them is an option.
I'm rather pleased with how the molding turned out. I cut out 3/16" and 1/8" strips of poster board (the cheap kind with both sides paper, no shiny side) and glued them together, narrower strip centered on the wider (more or less.) I had to fight to make them even and my 45 degree angles are pretty bad, even with the mitre chopper I was using, but paint should hide the worst of it.
I realize I've mentioned my first dollhouse, but never really written about it on my blog. Allow me to give you a tour, because I'm procrastinating from the Willowcrest already. I apologize for the bad photos, because I had to dig through very old hard copies taken with a cheap film camera a very long time ago.

Firstly, this is my great-grandfather, Jacob Knupp. I wrote a little about him here. Carpenter, contractor, fantastic workshop, enjoyed making miniatures, some of which his daughter sold at craft fairs. And he made dollhouses for me and my sister. He also made full scale furniture. I have a curio table of his sitting in my living room!
I don't think I have any pictures of my sister's dollhouse, but hers was bookshelf shaped, at least four stories tall, and white. Big rooms. The front door had a lock, basically a hook on a swivel that swung around and connected on a brad. It had come furnished with furniture made by Mom and various relatives. When we played in it I got relegated to the upper floors, she got to sit on the floor to reach her designated stories.
Then, maybe when I was about six, Gran drove out to our new house one day in his big blue truck, with a less tall but much wider dollhouse. I can remember seeing it in the back of the truck when he arrived. It was . . . different. He had gotten creative.
 |
| Front |
 |
| Side |
 |
| Back! |
This is a front AND back opening double sided dollhouse, allowing access to the two-deep rooms inside. It had a real floor plan. I've only ever seen one other like it, possibly in a book or museum that called it a turn-about house.
I loved it. We could both sit and play in the house together, she usually got the front with the stairs, but I got the back with the kitchen and the kitchen pantry shelves. No furniture, though, so I made do with whatever was the right shape, and slowly collected and scored over the years with presents. When I was about 12 or 13, I made my first dollhouse family. Previously it had been inhabited by bears. It sits on its own custom made table legs and rotates all the way around on a lazy susan.
 |
| Front. I had a carpet runner on the stairs at one point. |
 |
| Back. A very old view, but not the oldest! I originally had yellow floral contact paper covering the kitchen walls. |
 |
| Emptied out and planning a renovation. There is only one interior door, opening from the front hall to the blue dining room. |
 |
| Empty view of the back. I think the tiny room in the upstairs middle was supposed to be a bathroom, but it barely held the tub. I was also fascinated with wall murals. |
 |
| The attic floor is removable, allowing access and a good view of the floor plan upstairs. |
 |
| Apparently the kitchen shelves went through a lot of changes! |
 |
| Gran made the bed, my grandmother made the mattress and pillow. I made the quilt! |
 |
| Would you believe that floor is paper? |
 |
| Originally this was all shelving, but I got creative one day and made it look like a hutch. |
The poor thing is showings its age and abuse after 30 years. I wanted so badly to make it more to scale and electrify it, but since it was built by a man used to building full size houses, it's very difficult to tear out the thick molding without causing some damage. I'm also finding it hard to figure out wiring, since the house turns around. Perhaps in a few more years the battery operated lights will be good enough that I can add them without including wiring.
For right now I think my best bet for fixing it up is to repair as much of the damage as I can, give it a good coat of paint and/or wallpaper, and decorate it with nice furniture that's still good for playtime. My Willowcrest is definitely for adults only! There are some gouges in the walls and the front walls/doors need to be reattached. I'm setting the time period at early 20th century,1909-1916.
November 4, 2014
 I've been ignoring the Willowcrest all summer and most of the Fall, and kind of dreading all the work I still need to do. It's time to get back to it. So today, I finally sat down and started work on the kitchen cabinets.
I took a piece of posterboard, held it up against the wall, and drew cabinet outlines of what I thought would work best on the wall with the lower cabinets and appliances. Then I took the final shape and cut out two pieces, plus one inch wide strips for the sides. I decided that these would be faux cabinets, so the doors won't open. I don't really want people reaching in and pulling on things, and I have enough organizational dilemmas in my life without trying to figure out which cabinet would hold the weird shaped bowls the best in one inch scale! Right now they're not even glued on, just up there with a little Dollhouse wax to see if I like it when in place. I think it'll do, so tomorrow I will start making trim for the doors, plus drawer fronts for the bottom cabinets. Little steps!
Speaking of the bottom cabinets, I am not happy with them. I used matte board to do the fronts, and it just doesn't look right or take paint right. I'm going to have to redo them.
I also plan to make a new refrigerator (unopenable) and a mounted microwave. (The one currently holding up the upper cabinets is just not big enough for the space above the oven.) I also need to figure out the faucet for the sink. I bought a set, but they were ridiculously small.
October 13, 2014
 I acquired a recipe a while back that was allegedly the salsa from The Tortilla Factory in Herndon, VA.
Problem is, I can't QUITE get it right. Last time I thought it was because I switched ground red pepper and crushed red pepper flakes. You don't want a tablespoon of ground red pepper (cayenne) in anything! I managed to subdue it with a lot of brown sugar.
This time, I had several pounds of tomatoes from my garden, nearly enough to make this recipe, so I thought I'd try again. I had to buy a few tomatoes to get enough.
To follow the recipe, I had to acquire 29 ounces of crushed tomatoes, which, of course, I had to look up how to do.

You're left with creepy, naked tomatoes. These things are SLIPPERY. Really, really slippery. "Slippery as a skinned tomato" is now going to be my new description for things that are really hard to pick up and threaten to shoot across them room if you squeeze them too hard.
Next I was supposed to quarter them, cut out the stem part and any hard or bad bits, and scoop out the seeds and water. This was rather challenging, due to their slippery nature and the fiddlyness of the seeds.

I essentially destroyed these tomatoes. I just ended up using my hands, and was grateful the phone never rang, because they were covered in tomato juice and pulpy bits.
The part after was to mash it up well. The instructions I had weren't clear if you were supposed to do this while cooking, but I started it in a bowl and then continued mashing the more stubborn bits while it cooked.

That's technically a potato masher, but since I've never actually used it to mash potatoes, it is officially my tomato masher. It worked really well for this step.

Now it's starting to look right! once this finished cooking, I could have also turned it into pizza sauce, or just saved it for a future project, which is what I probably should have done. I'm not sure if I could have turned it into soup, or if that's a completely different project.
I measured before and after processing. I had 3.75 pounds of tomatoes before, and after I ended up with 32 ounces of sauce. I'm sure this will vary, but at least it's enough for a quart.

I next added my ingredients for the salsa. This is pre oil and vinegar stage, and I should probably have stopped there, because after this is where things went wrong. The vinegar completely overwhelmed the salsa, to the point where I had heartburn all night after tasting it. I'm not sure even brown sugar can save this.

The second problem was that I decided to put it in the mixer to get rid of some of the chunks, and, well, it turned ORANGE. It was certainly NOT orange when I did an initial stirring before putting it in the blender. This hadn't happened the first time! From what I read online, it has something to do with oxygen being mixed in too fast, or at least that seems to be the main guess of other people.
I'm pretty upset that it turned out so disappointingly. I opted to freeze it anyway, since I can't have chips right now due to oral surgery. I separated it into lots of smaller bags, so once in a while I may get up the nerve to play with one and see if I can't make it palatable.
I don't feel right providing the recipe, but it can easily be found by doing an Internet search for Tortilla Factory Salsa.
Subscribe to:
Posts (Atom)